Kubernetes
In Cloudchipr, you can connect your Kubernetes clusters to monitor live resources, analyze usage metrics, track historical container costs, and identify optimization opportunities.
Once connected, you can:
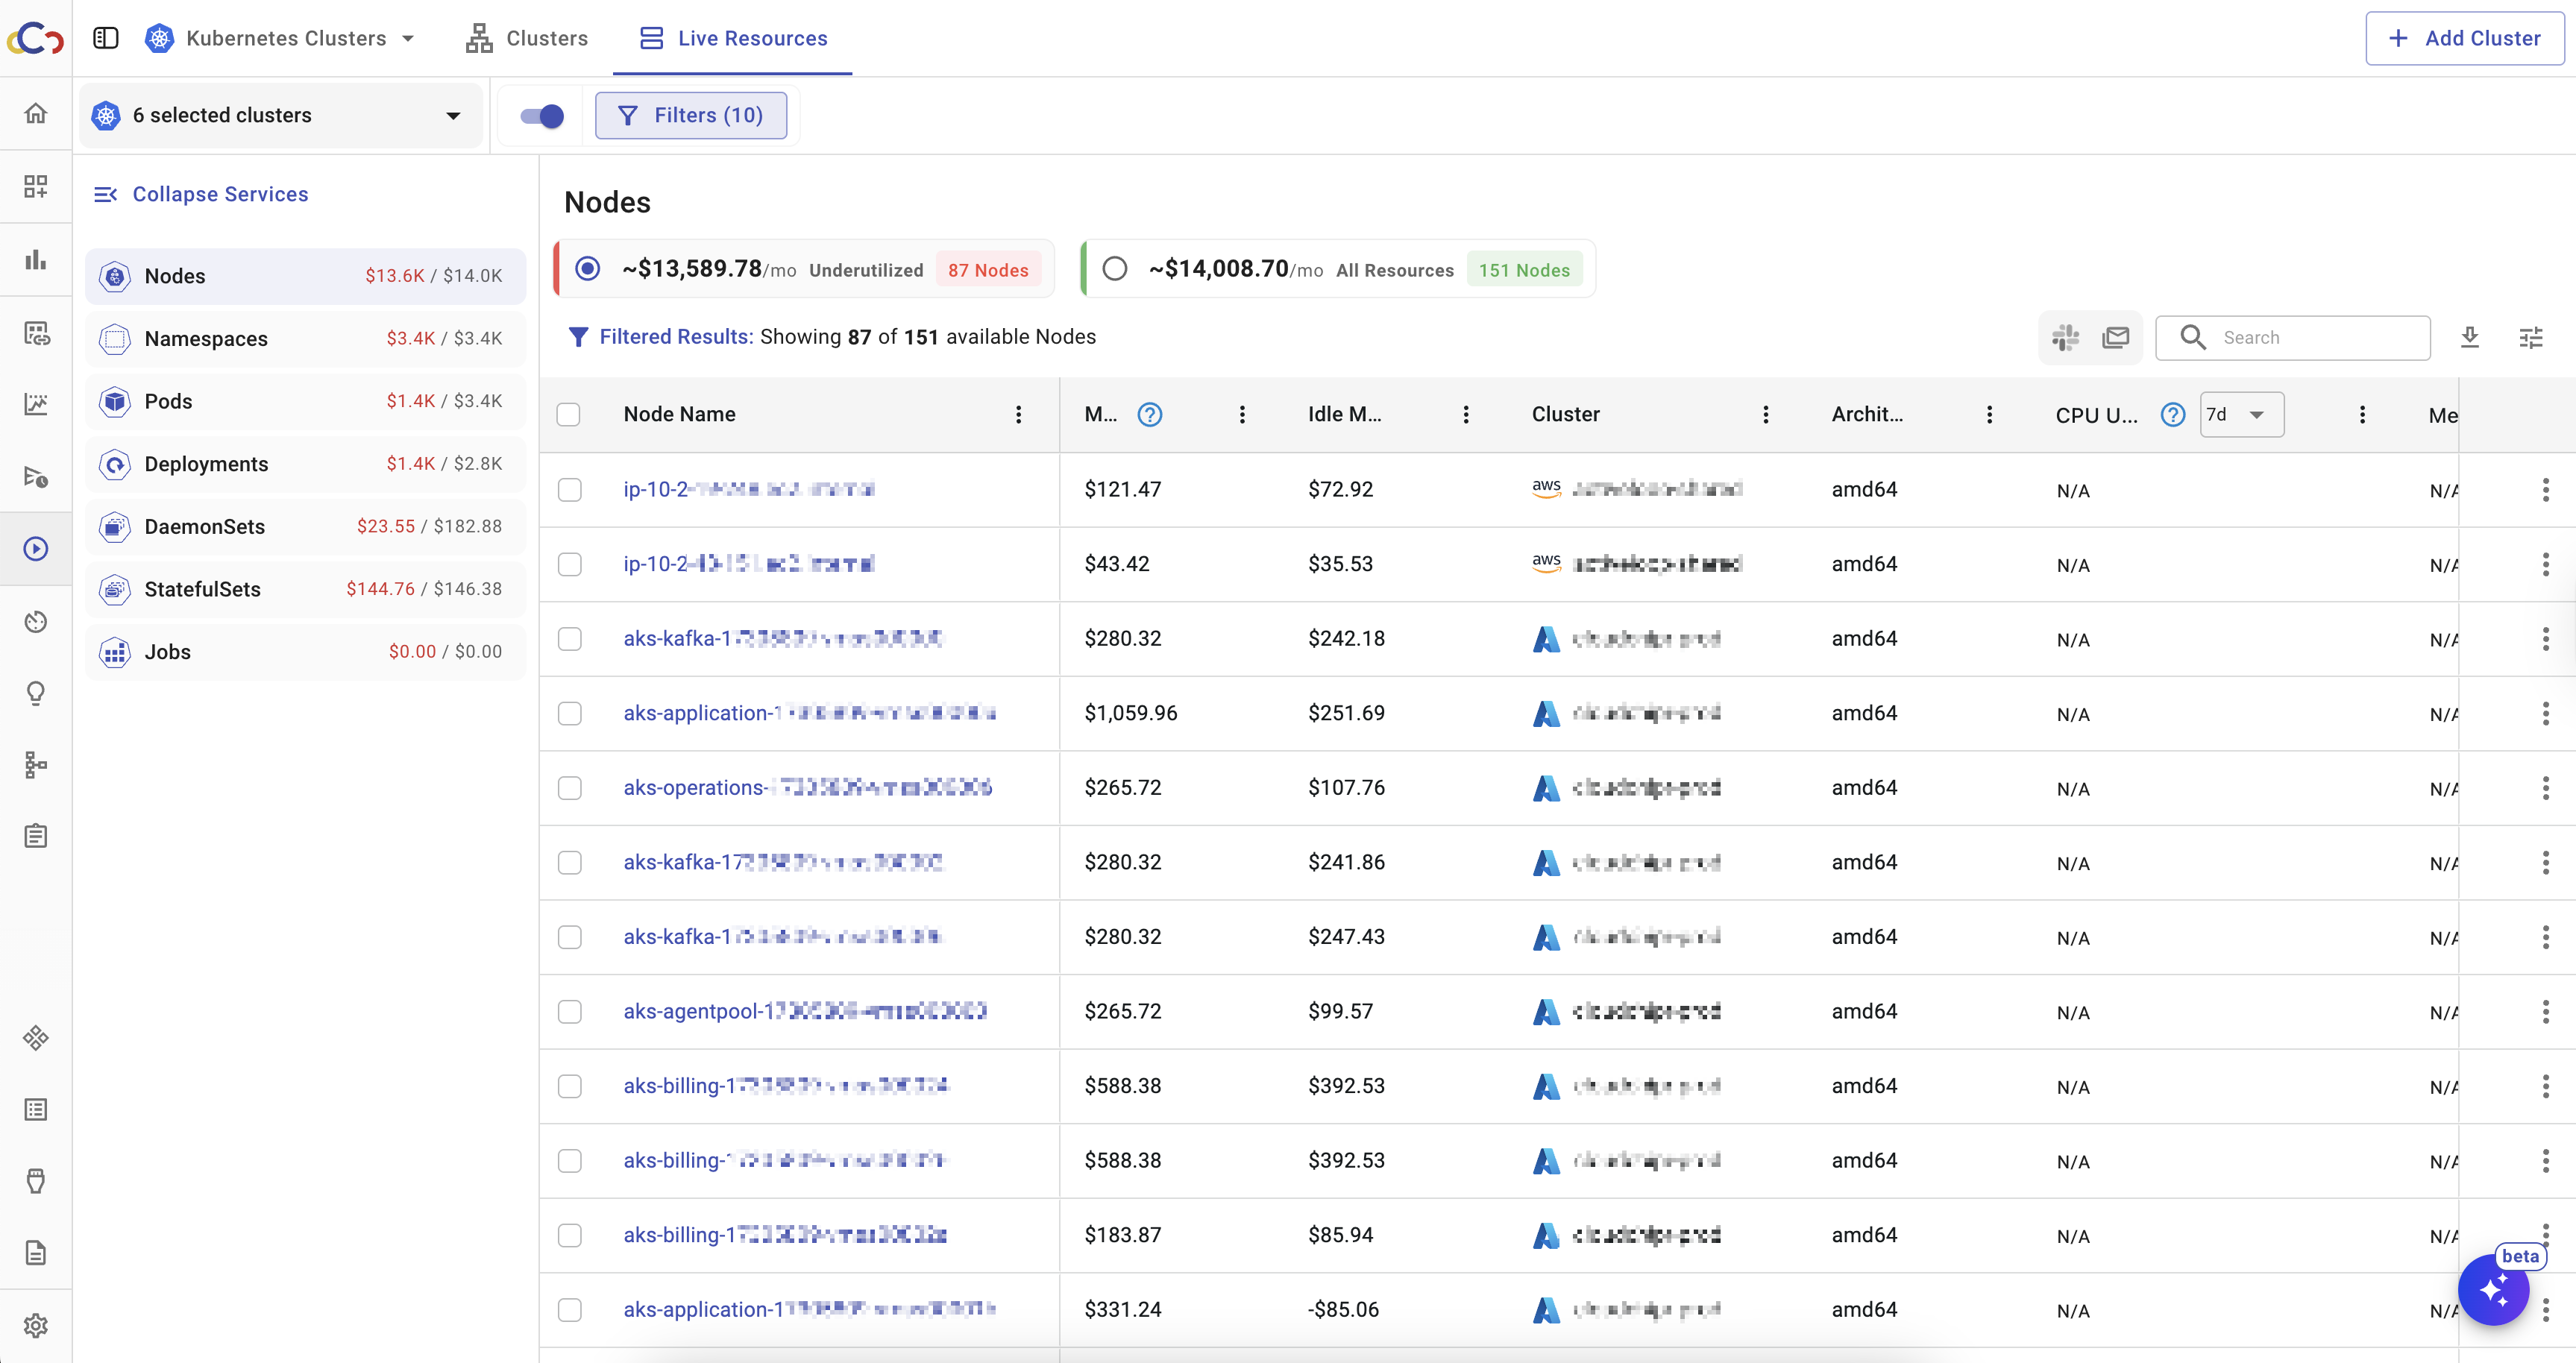
- View Live Resources – Access details for Clusters, Nodes, Namespaces, Pods, Deployments, DaemonSets, StatefulSets, and Jobs. Review metrics for each resource and identify underutilized workloads.
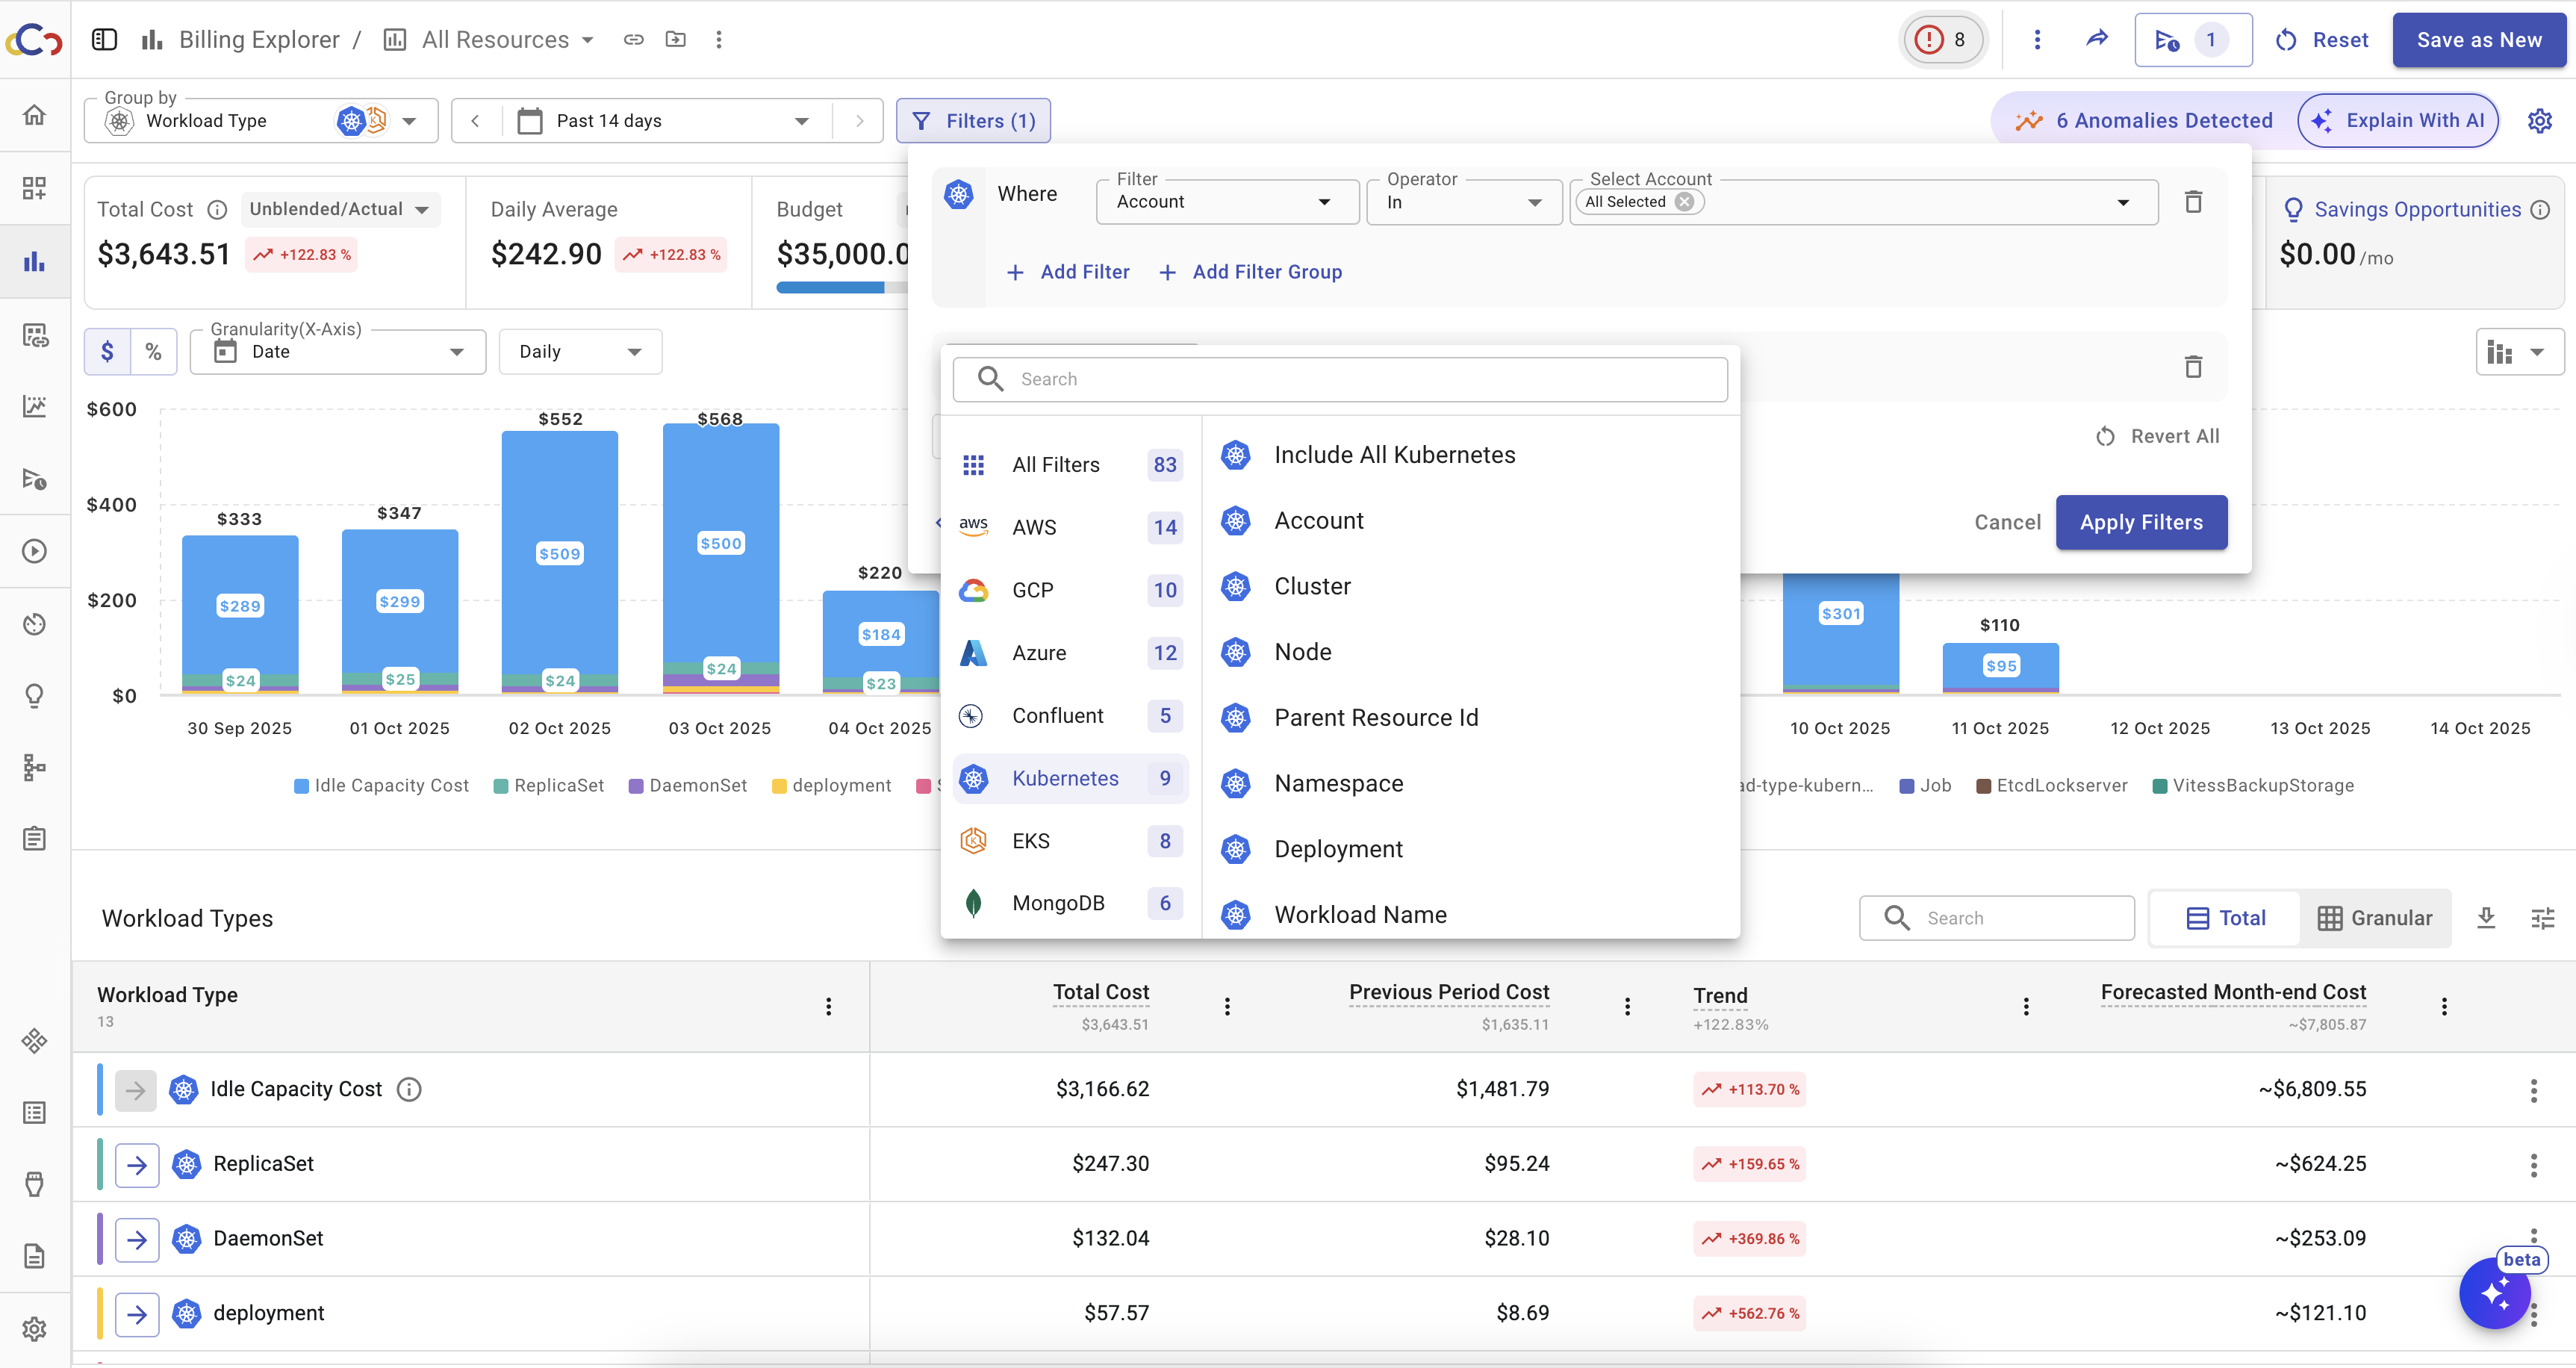
- Track Container Costs – Use the Billing Explorer to view historical cost data for Kubernetes resources. Group costs by clusters, namespaces, nodes, or any other Kubernetes resource.
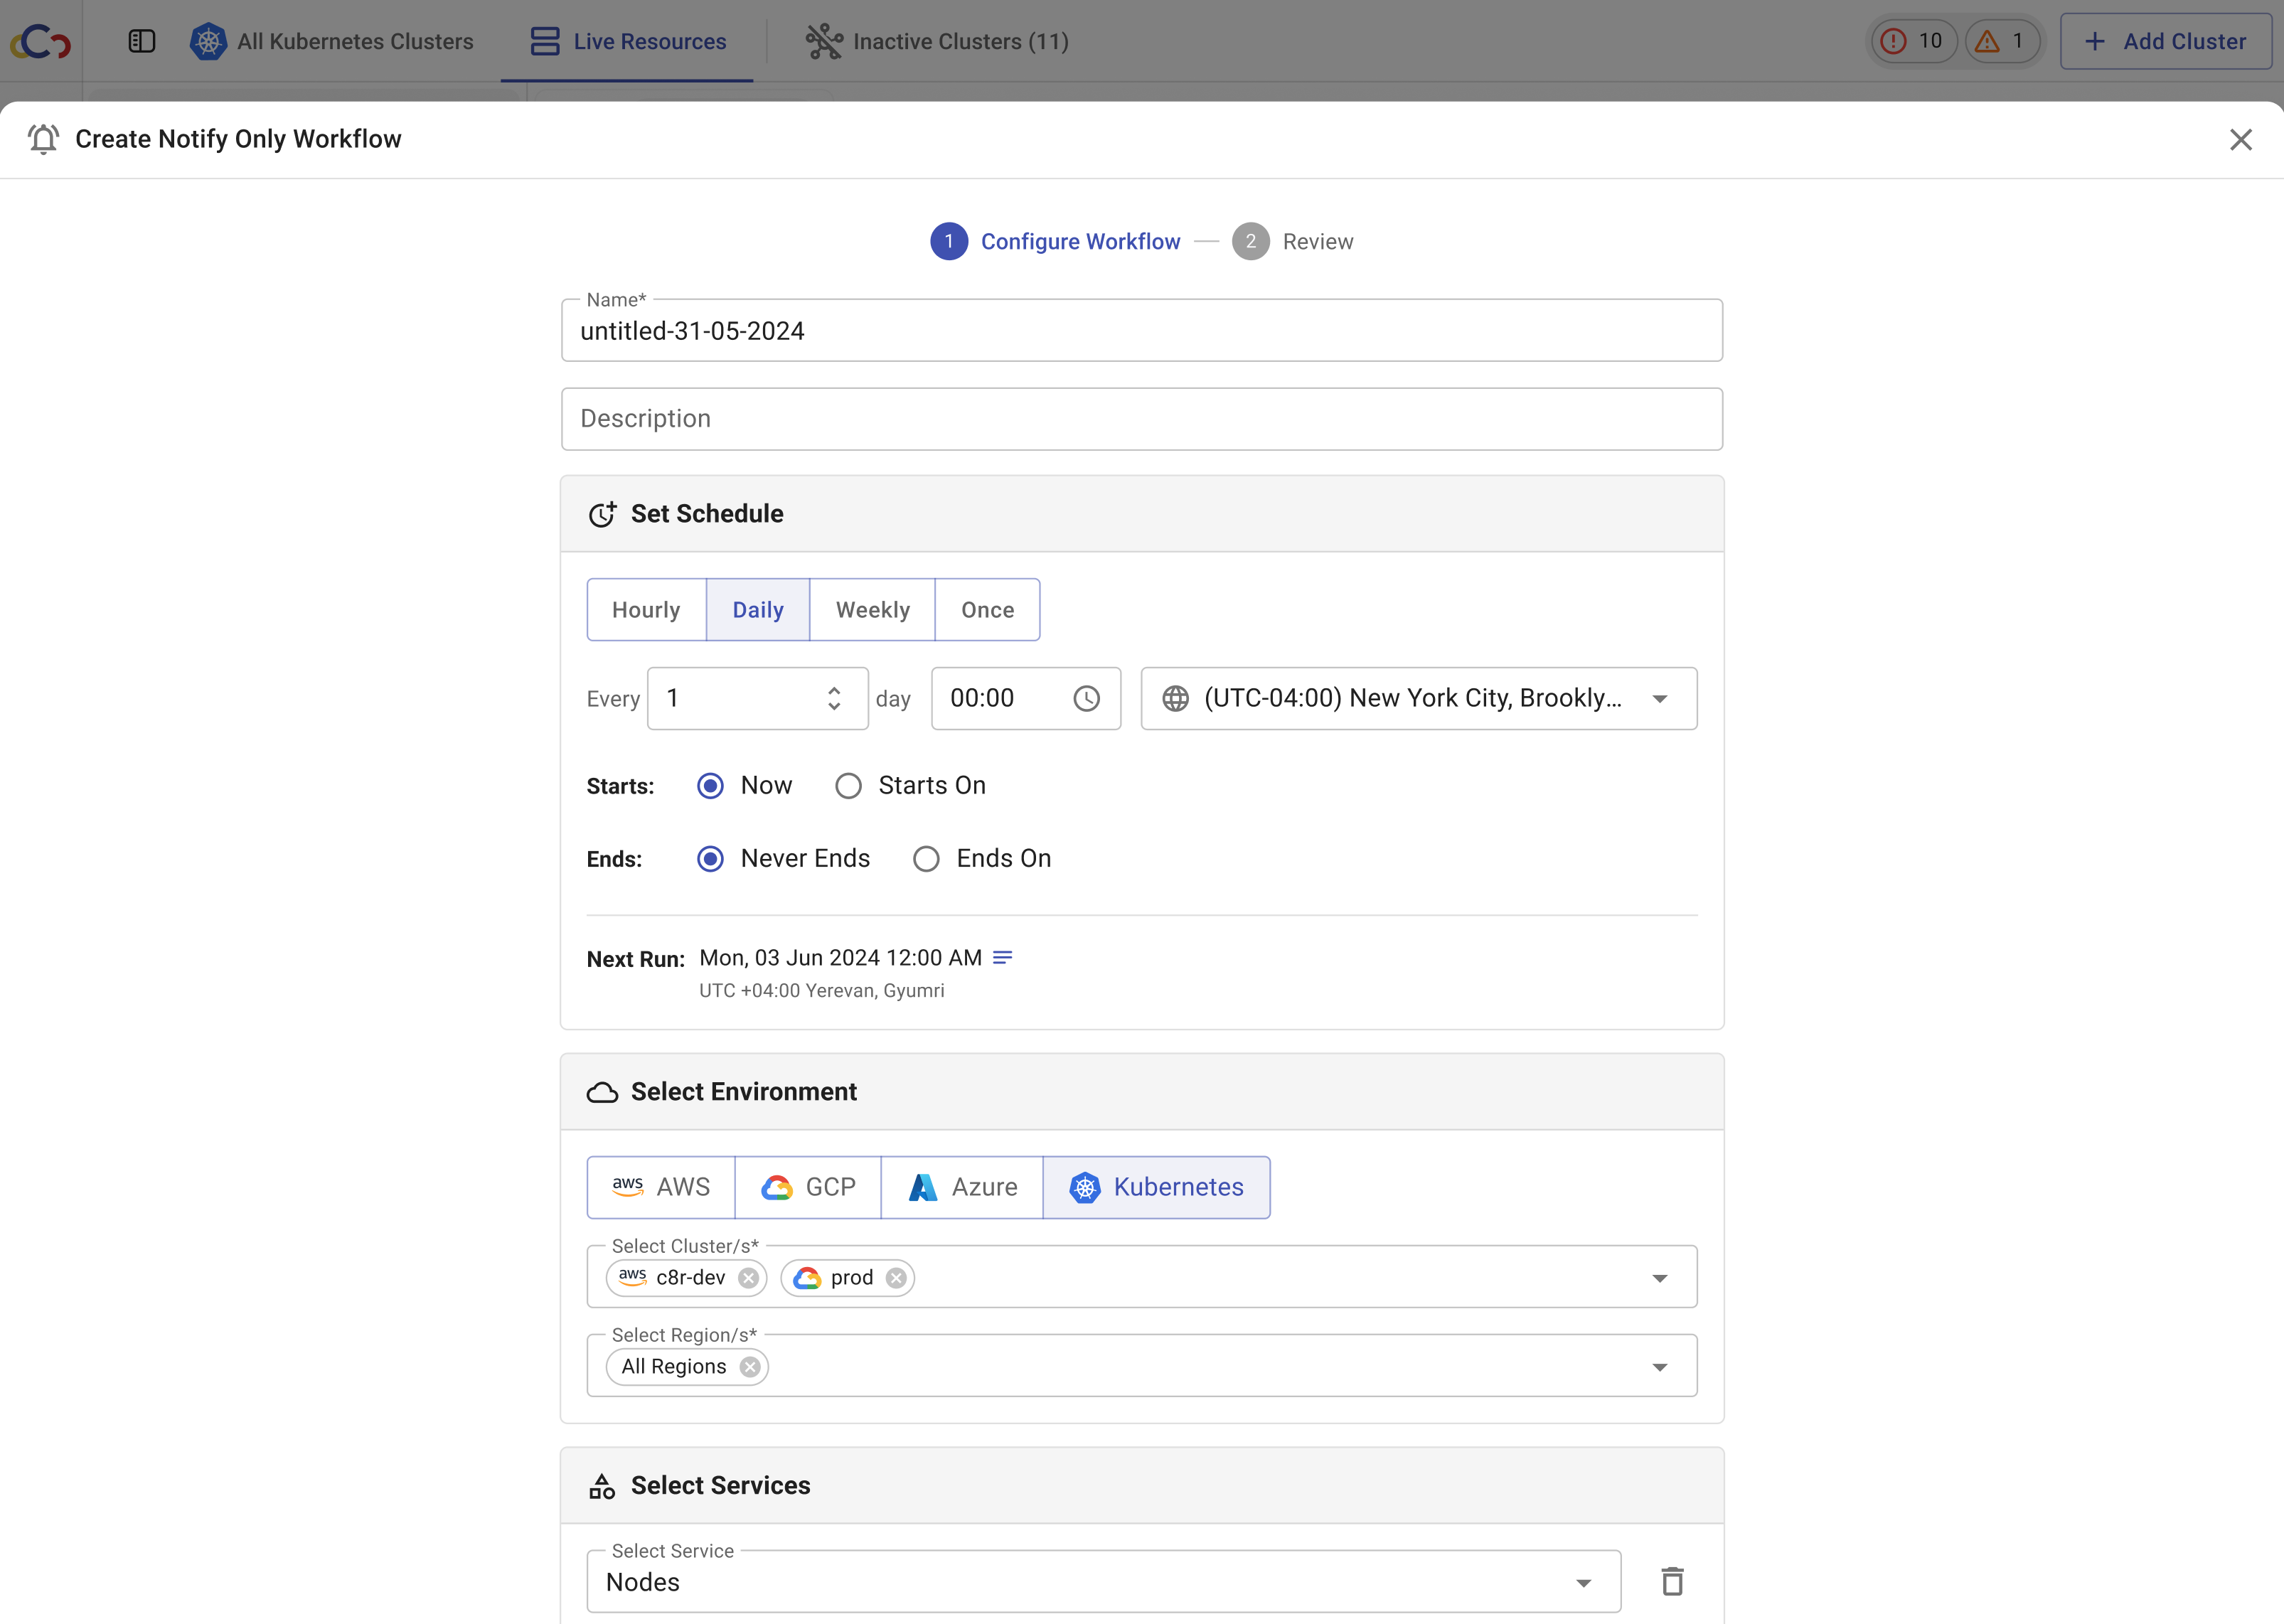
- Set Up Automations – Configure alerts to notify you when costs exceed defined thresholds.
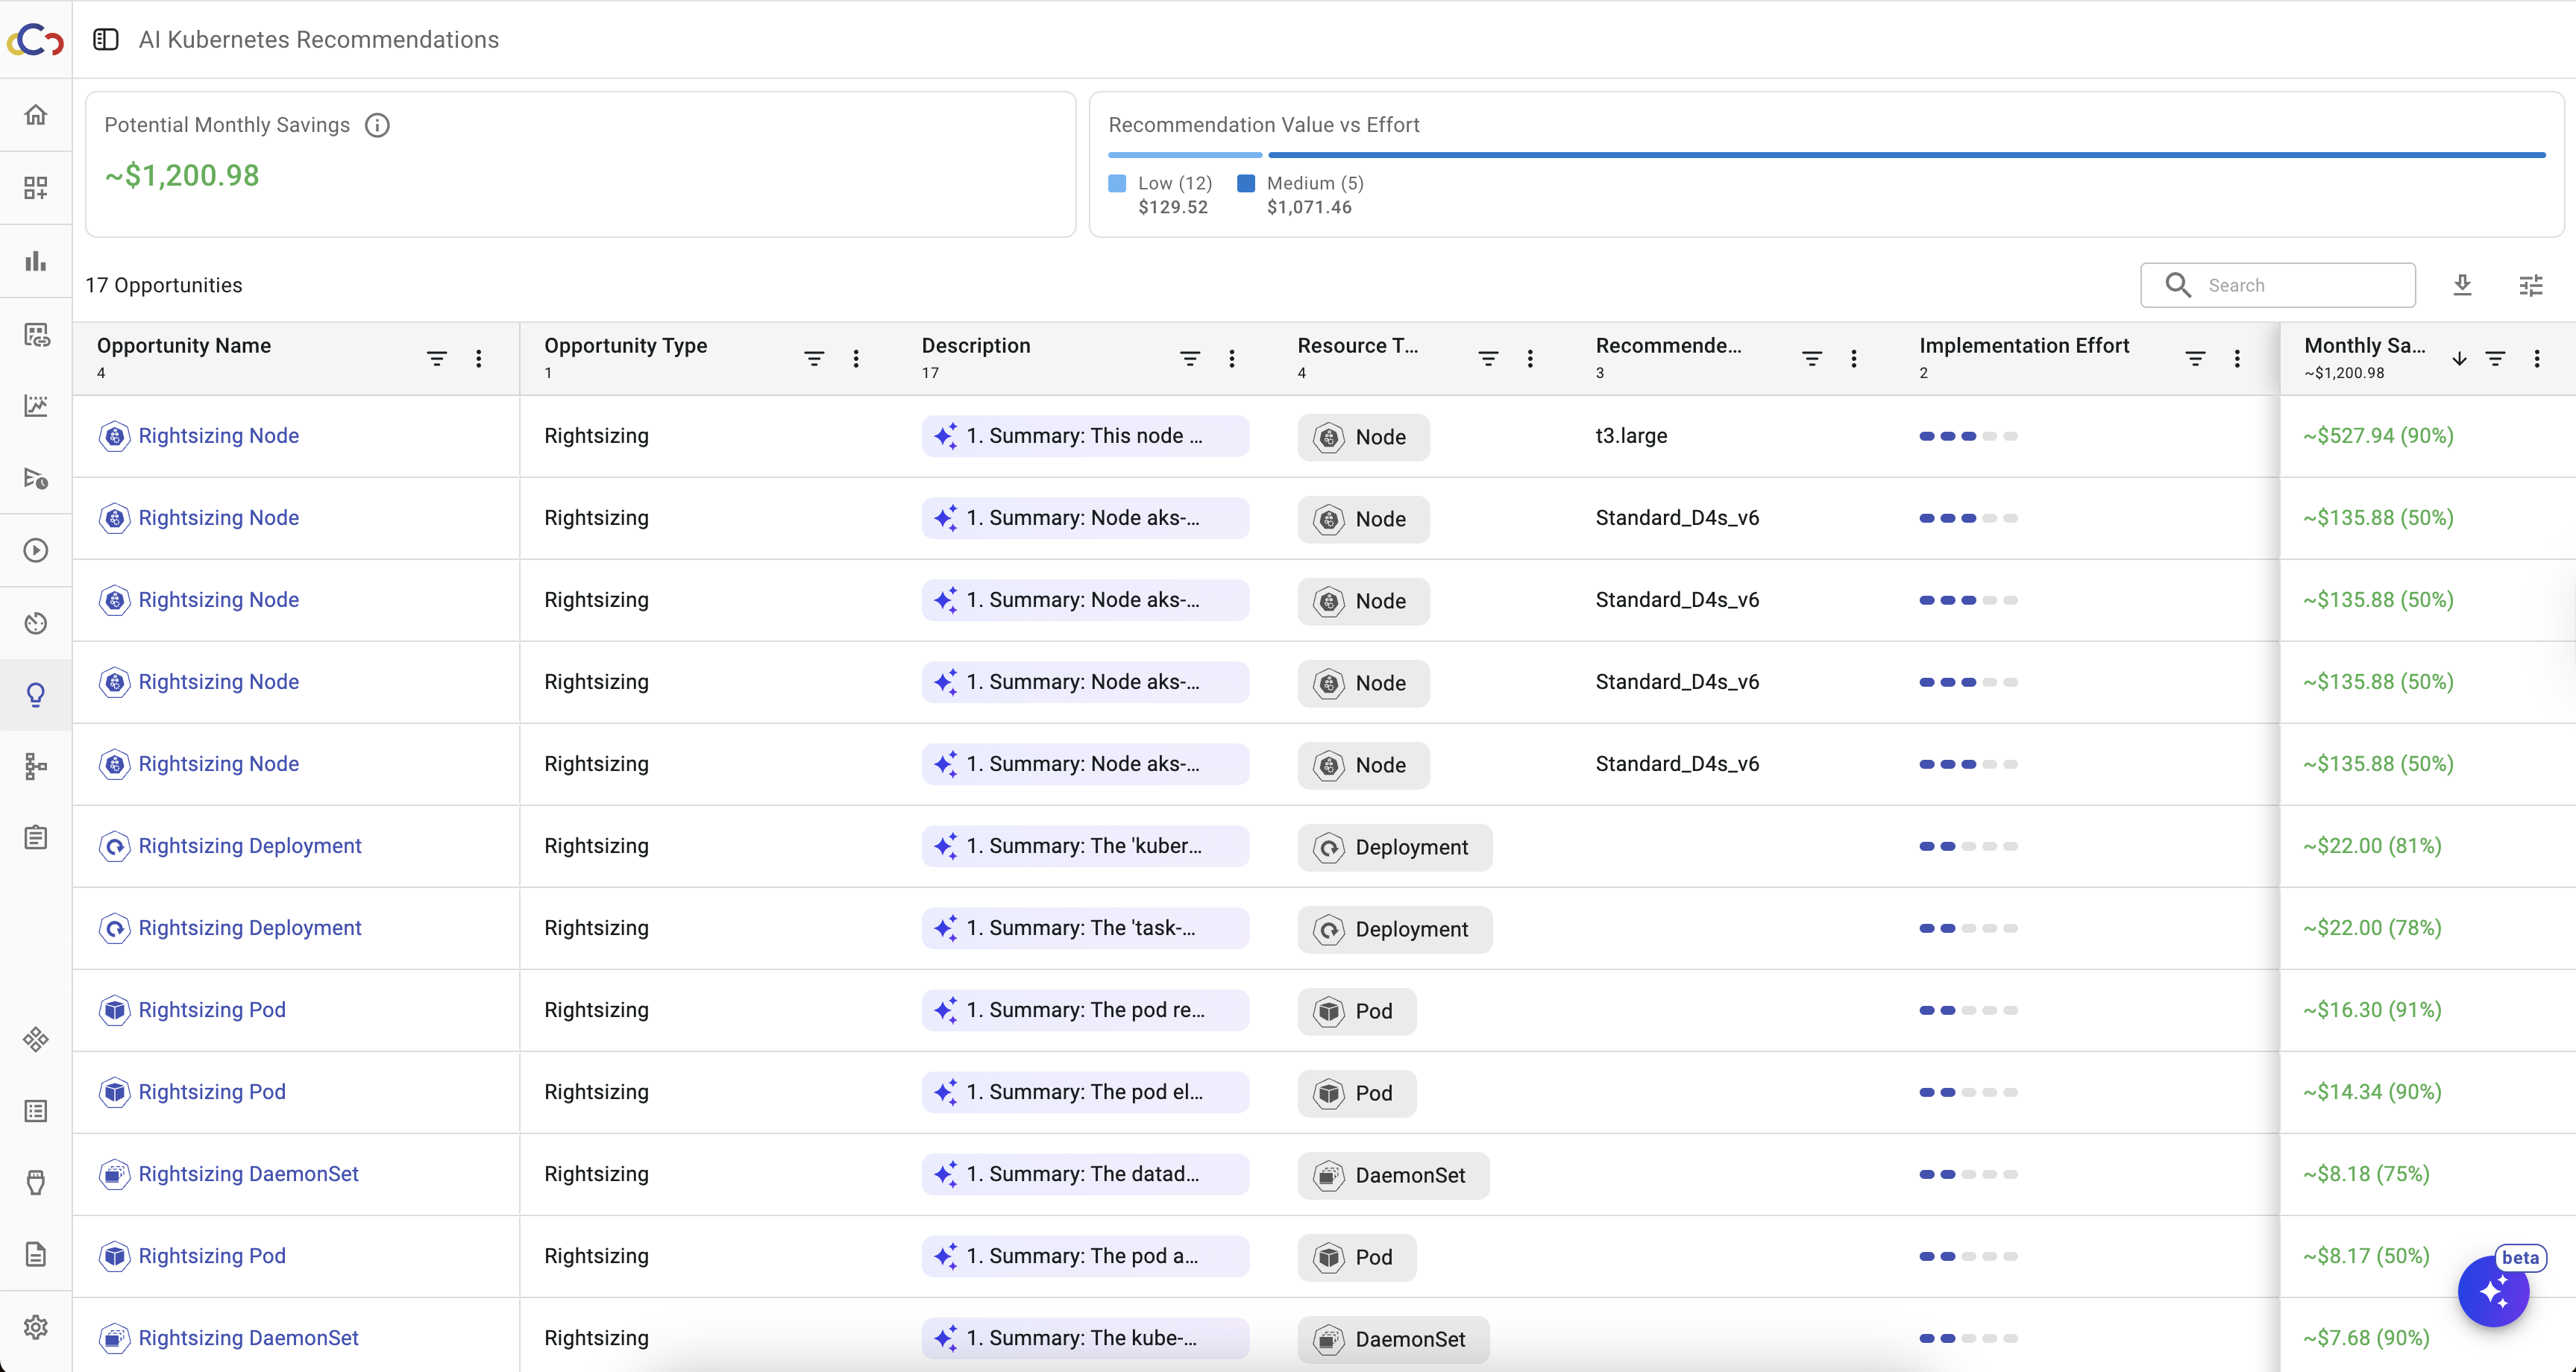
- Optimize Workloads – Receive recommendations based on resource usage and efficiency. (The option to generate GitHub pull requests directly from recommendations is coming soon.)
- Use standard tools – Apply the same filtering, reporting, and management capabilities available for other cloud resources in Cloudchipr.
Connect Cluster
You can connect Kubernetes clusters to Cloudchipr using the following steps:
- Navigate to the Integrations page.
- Select Kubernetes to open the Kubernetes integration page.
- Click
Connectto open the drawer.
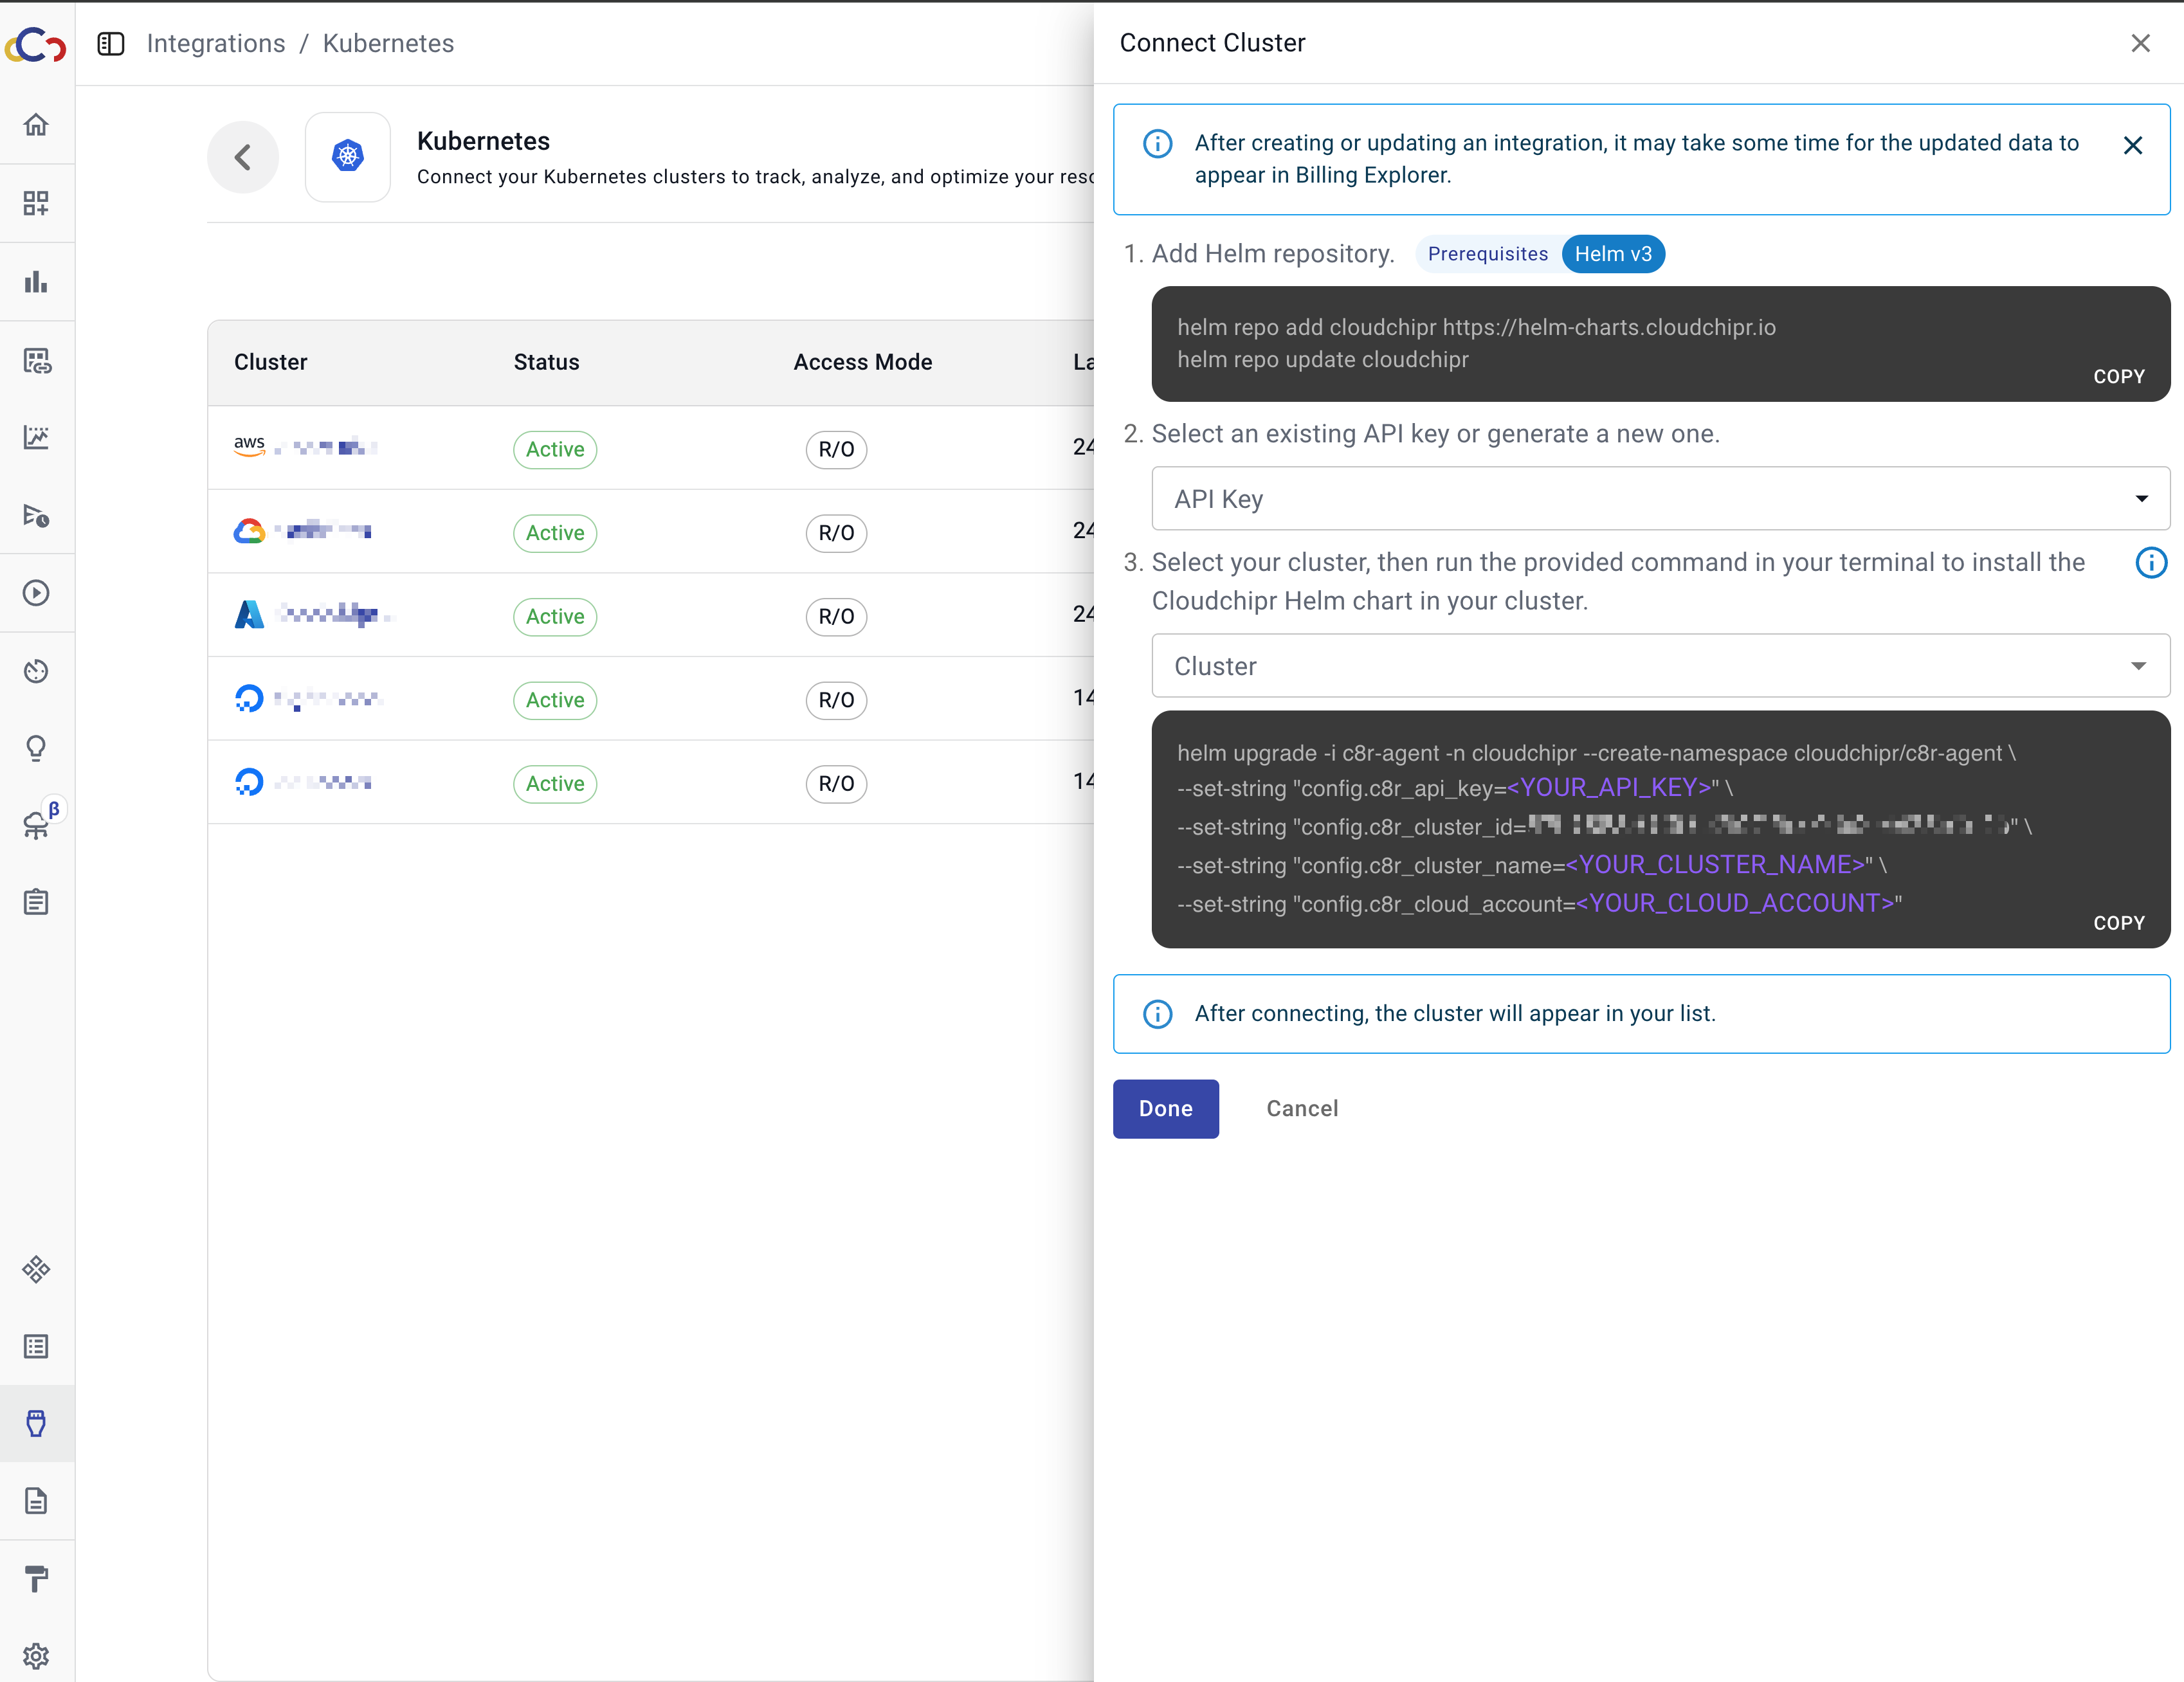
Follow the steps in the drawer (Prerequisites: Helm v3).
- Add the Helm repository
Copy and run the command provided in the drawer to add the Cloudchipr Helm repository. - Select an API key
If you do not have one, go to the API Settings page to generate a new API key. - Select your cluster, then run the generated command in your terminal
Ensure your terminal is connected to the correct cluster before running the command. This command installs the Cloudchipr Helm chart in your cluster.
After completing the steps, the cluster will appear in your list.
Kubernetes Recommendations
The Opportunities page provides Kubernetes optimization recommendations based on resource usage, including CPU, memory utilization, and requests. Recommendations are available for the following resource types:
- Node
- Pod
- Deployment
- StatefulSet
- DaemonSet

Viewing Recommendations
Each recommendation includes a Description column. Hovering over this column displays a detailed explanation of why the recommendation was generated.
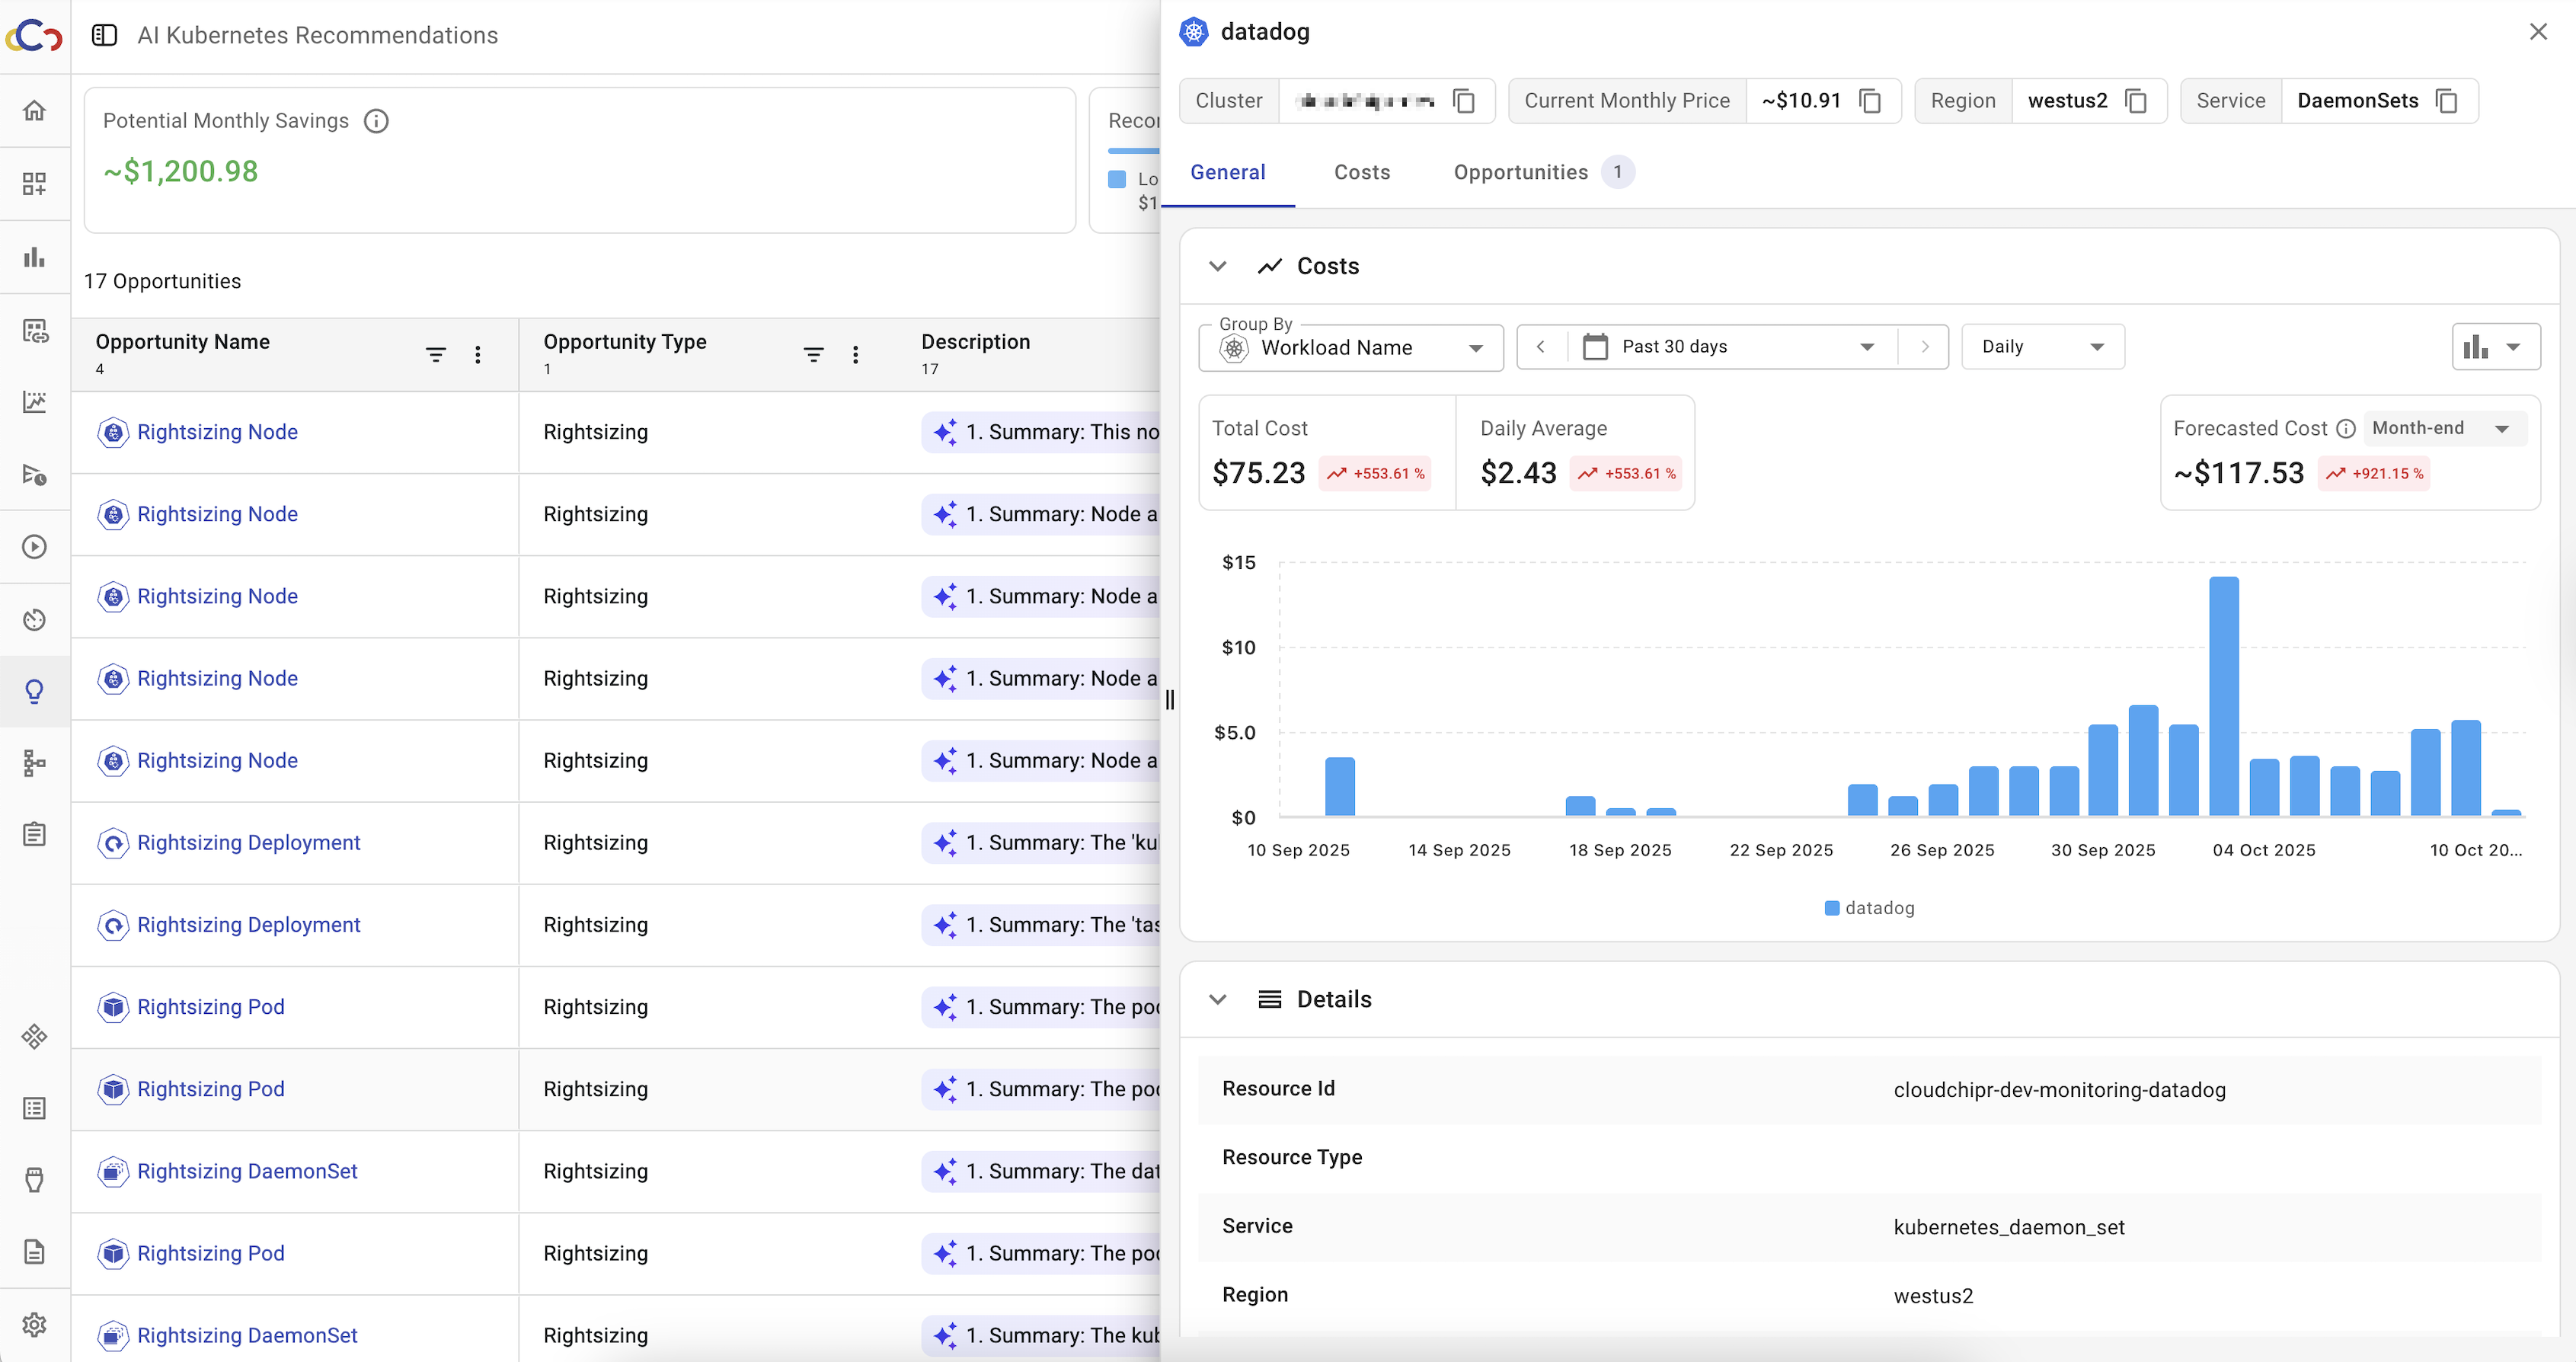
Clicking the opportunity name opens the Resource Drawer, where you can view all data related to that resource, including the associated recommendations.
Supported Resource Types
Cloudchipr supports full visibility into Kubernetes resources across both Billing Explorer and Live Resources.
- In Billing Explorer, all Kubernetes-related resource types are supported, allowing you to drill down into costs at any level of detail.
- In Live Resources, Cloudchipr collects data every 15 minutes to provide near real-time usage information.
In Live Resources, the following Kubernetes resource types are supported:
| Resource Type | Supported Filters |
|---|---|
| Cluster | |
| Node | Name Instance Type CPU Utilization (Cores) CPU Utilization (%) Memory Utilization (Bytes) Memory Utilization (%) Monthly Price Region Kubernetes Label Architecture |
| Namespace | Name Monthly Price Pods Age Kubernetes Label |
| Pod | Name CPU Utilization (Cores) CPU Utilization (%) Memory Utilization (Bytes) Memory Utilization (%) CPU Request Memory Request Monthly Price Namespace Age Kubernetes Label Workload Type Workload Name |
| Deployment | Name CPU Utilization (Cores) CPU Utilization (%) CPU Request (Cores) Memory Utilization (Bytes) Memory Utilization (%) Memory Request (Bytes) Monthly Price Pods Namespace Age Kubernetes Label |
| StatefulSet | Name CPU Utilization (Cores) CPU Utilization (%) CPU Request (Cores) Memory Utilization (Bytes) Memory Utilization (%) Memory Request (Bytes) Monthly Price Pods Namespace Age Kubernetes Label |
| DaemonSet | Name CPU Utilization (Cores) CPU Utilization (%) CPU Request (Cores) Memory Utilization (Bytes) Memory Utilization (%) Memory Request (Bytes) Monthly Price Pods Namespace Age Kubernetes Label |
| Job | Name Namespace Age Kubernetes Label |
Kubernetes Resource Drawer
When you click on a Kubernetes resource in Billing Explorer, Live Resources, Tasks, or Opportunities, a drawer opens showing detailed information about that resource.
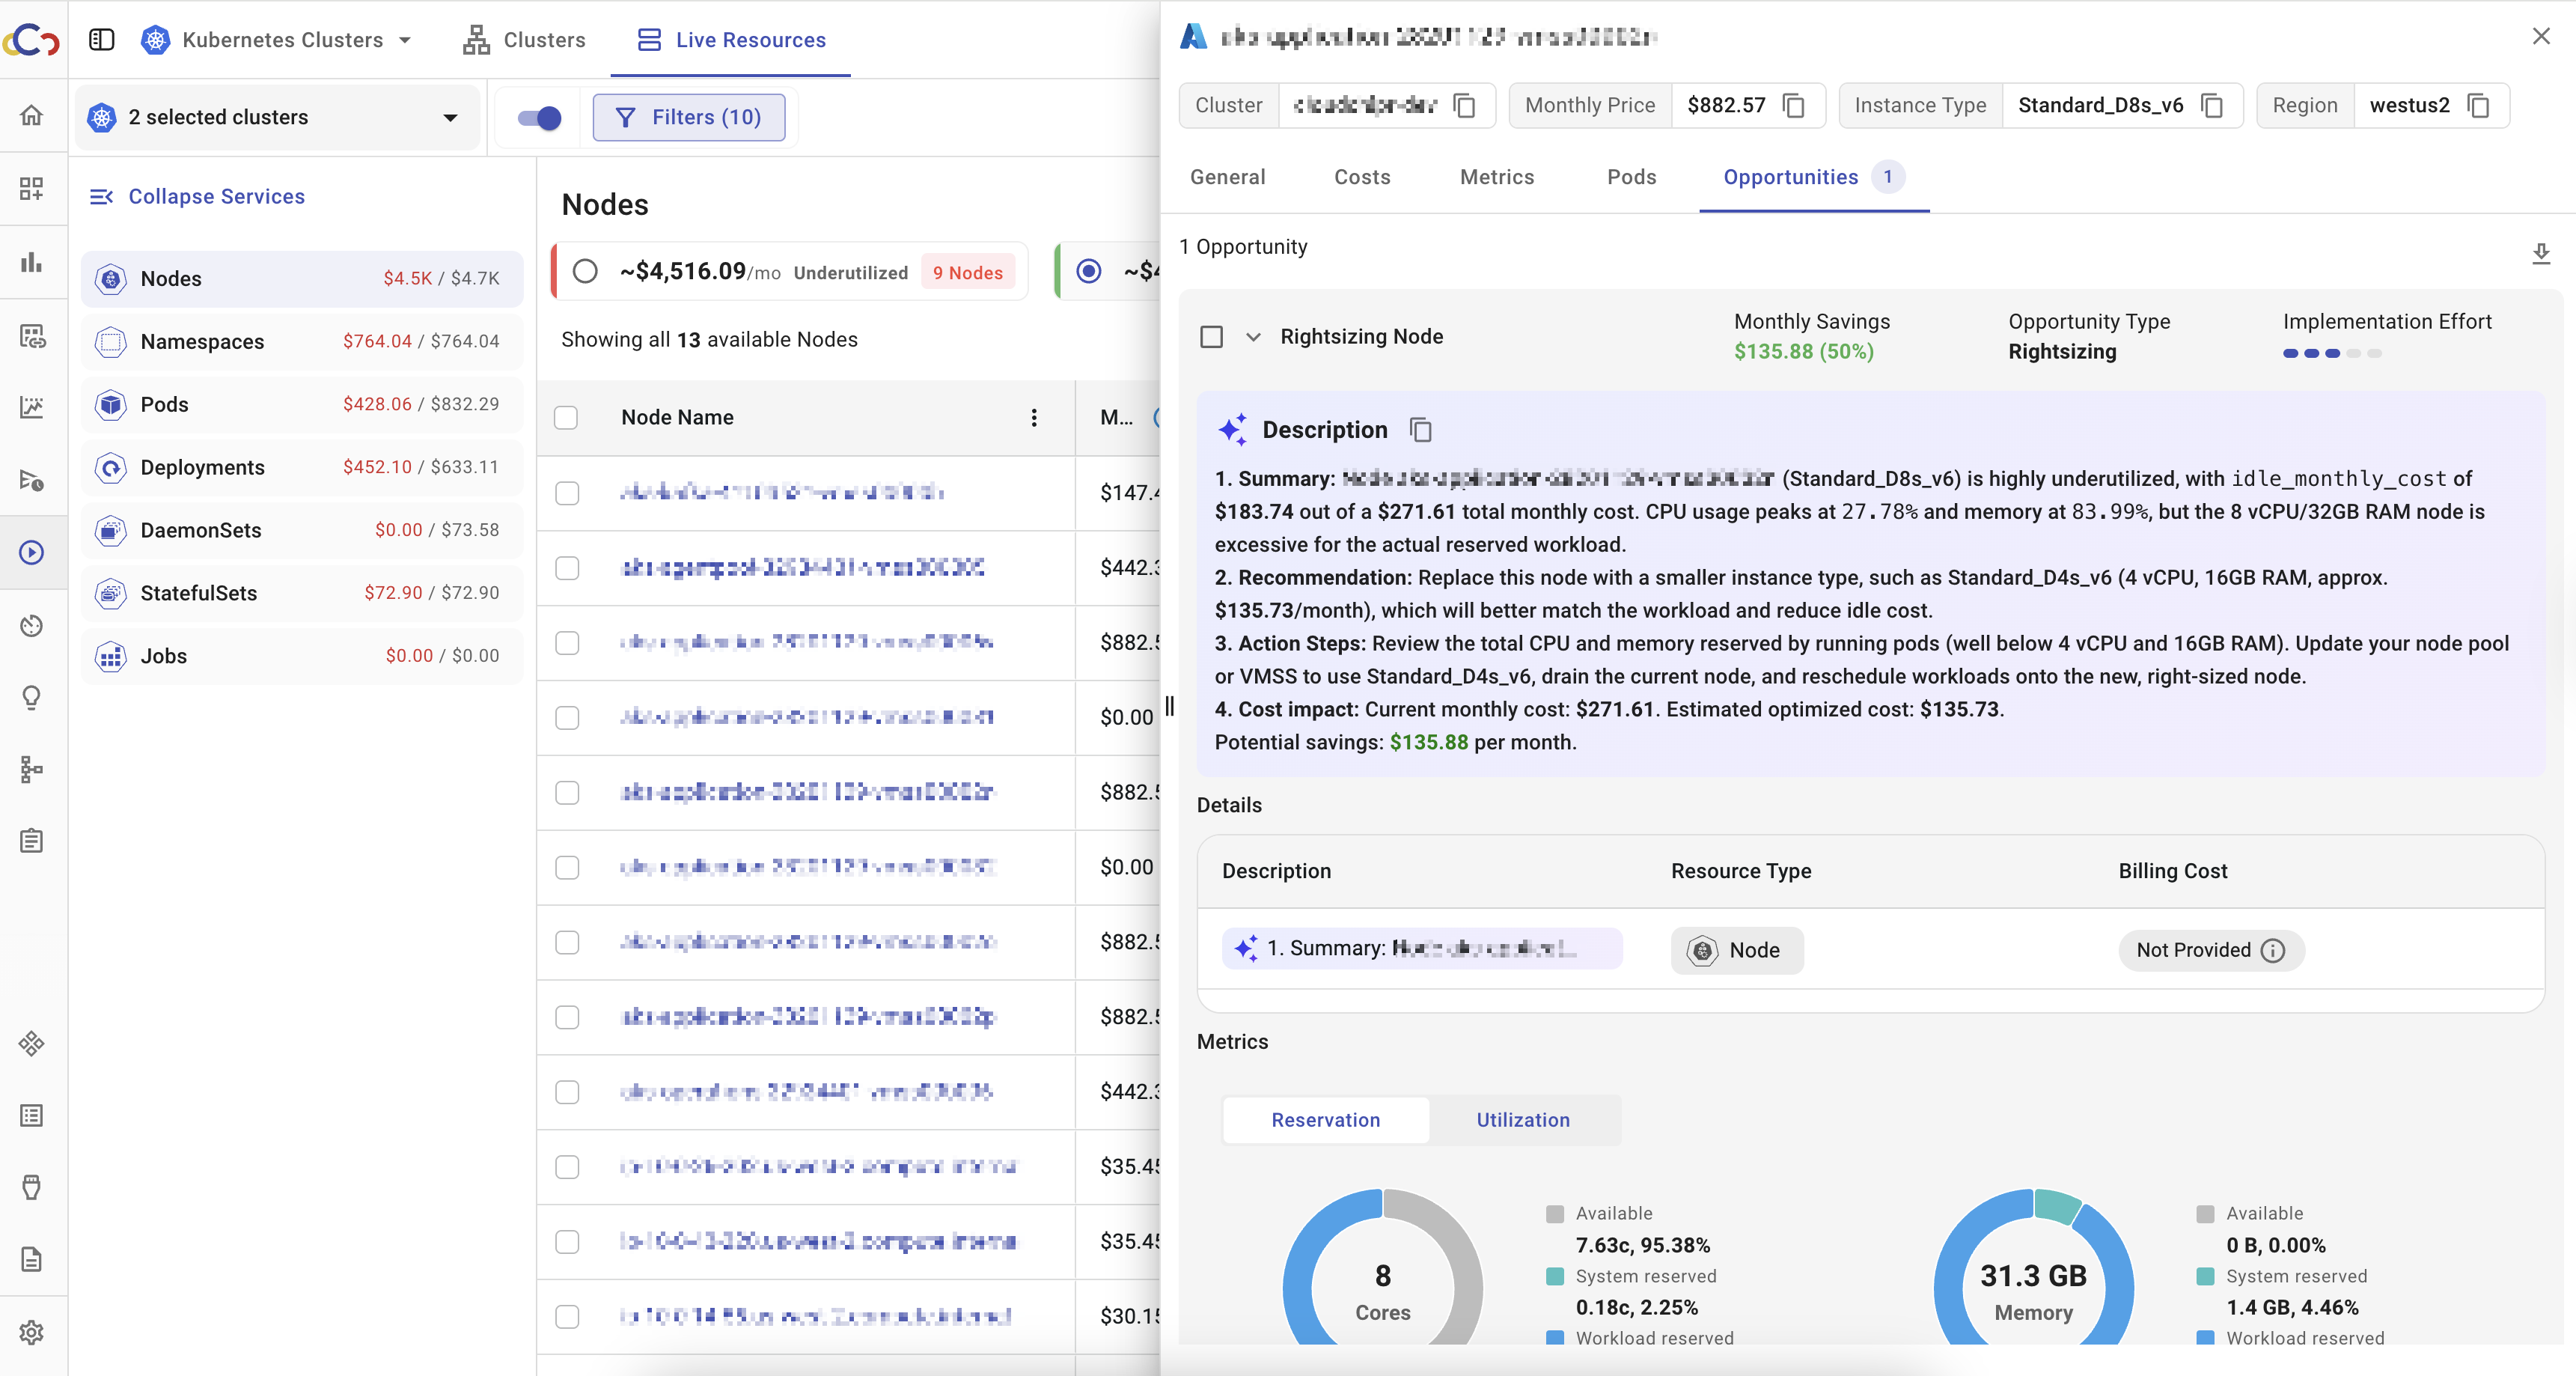
Header
The drawer header displays key identifiers such as:
- Cluster
- Namespace
- Instance type
- Region
Tabs
The drawer is organized into the following tabs:
- General
The General tab includes three sections:- Cost – Historical billing cost of the resource.
- Details – All available resource details.
- Kubernetes Labels – All labels associated with the resource.
- Costs
The Costs tab allows you to:- Select a date range to analyze spend.
- View total cost and forecasted end-of-month cost.
- Break down costs by dimensions such as workload name, usage type, or description.
- Metrics
The Metrics tab displays Reservation and Utilization metrics.- Time ranges: 24 hours, 7 days, or 30 days.
- Statistics: maximum, minimum, sum, and average for each metric.
- Pods
The Pods tab lists all pods related to the selected resource. - Opportunities
The Opportunities tab lists savings opportunities for the resource.- Each opportunity is expandable.
- Clicking an item shows detailed information about the recommendation.
Updated 5 months ago