Workflows
You can take resource-specific actions directly within Cloudchipr or automate them using Workflows. With Cloudchipr, there’s no need to write scripts. Our no-code automation workflows let you easily monitor your cloud environments based on any criteria.
Workflows can automatically run actions, send reports, notify your team, clean up unused resources in sandbox accounts, and manage nearly any operation across your cloud infrastructure.
Workflows allow you to set up scheduled jobs based on defined conditions and actions without writing code. For example, you can create a workflow that runs hourly across all cloud accounts to snapshot and delete unattached disks, or one that checks resources with a specific tag and either notifies or deletes them if the tag indicates expiration.
Create a Workflow
Workflows can be configured in two modes:
- Action Workflows – perform an action (such as snapshotting or deleting) and optionally send a notification.
- Notify-Only Workflows – send a notification when the condition is met, without performing any action.
Action Workflows
Navigate to the Automations > Workflows tab and click on the Create Workflow button, which will then show the actions menu with two actions. Click on Take Action.
Start by giving your workflow a clear and descriptive name. The name should help you and your team easily identify its purpose, especially when managing multiple tasks. You can also add an optional description to provide more context.
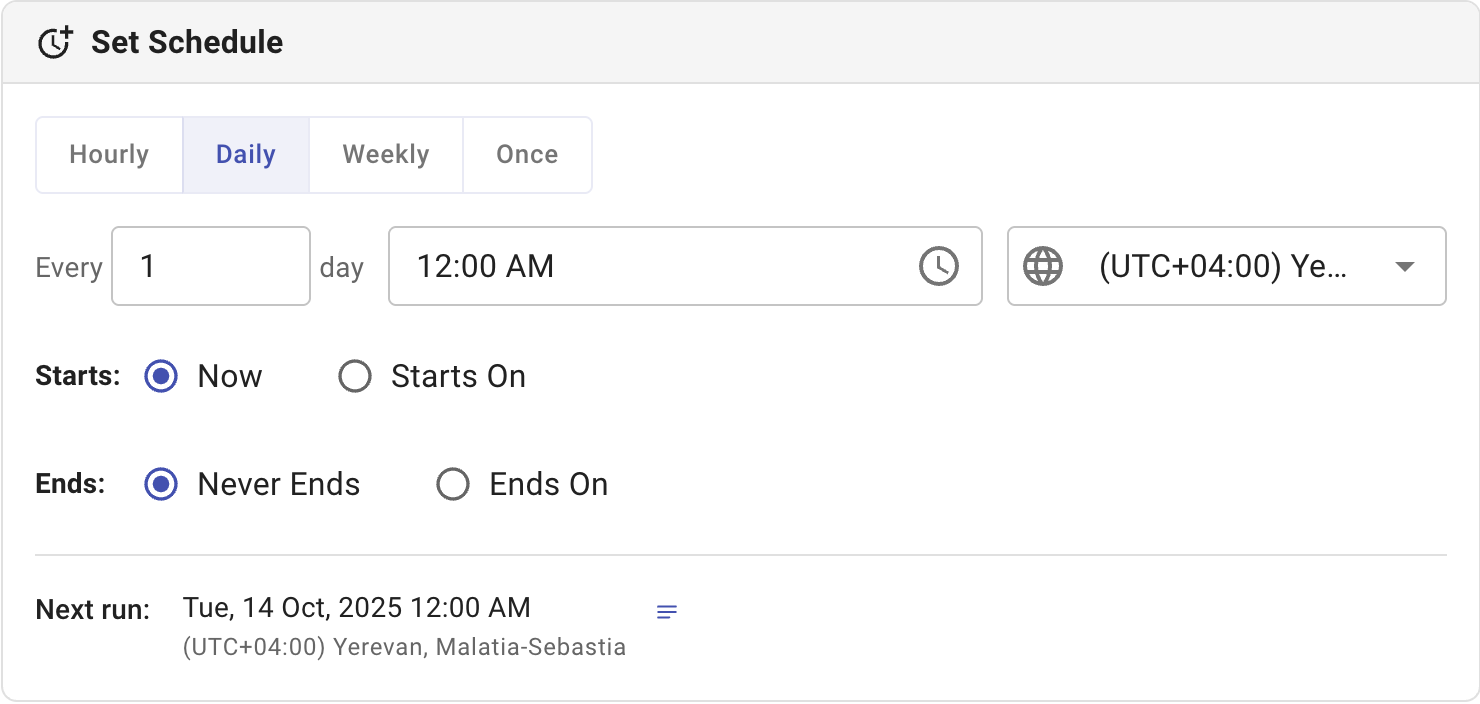
Step 1. Set Schedule
Define how often and when the workflow should run. You can choose from Hourly, Daily, Weekly, or Once options.
- Every: Specify the frequency (e.g., every 1 day).
- Time: Set the exact time when the workflow will run.
- Timezone: Select the appropriate timezone for the schedule.
- Starts: Choose whether the workflow should start immediately (Now) or on a specific date.
- Ends: You can let it run indefinitely (Never Ends) or define an end date.
The Next run field displays the upcoming execution date and time based on your configuration.
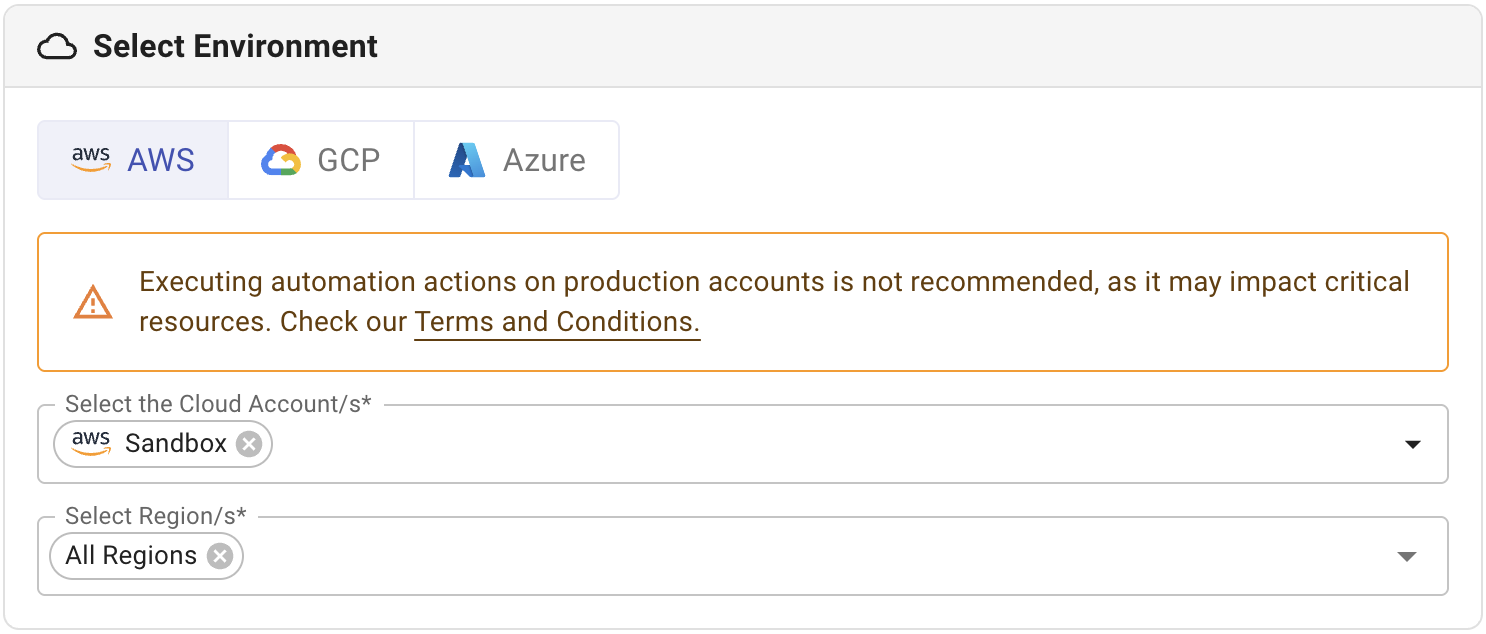
Step 2: Select Environment
Choose the cloud environment where the workflow will be executed.
Supported providers:
- AWS
- GCP
- Azure
Within your chosen cloud provider, select one or more accounts and regions. This step allows for broader or more targeted workflow application.
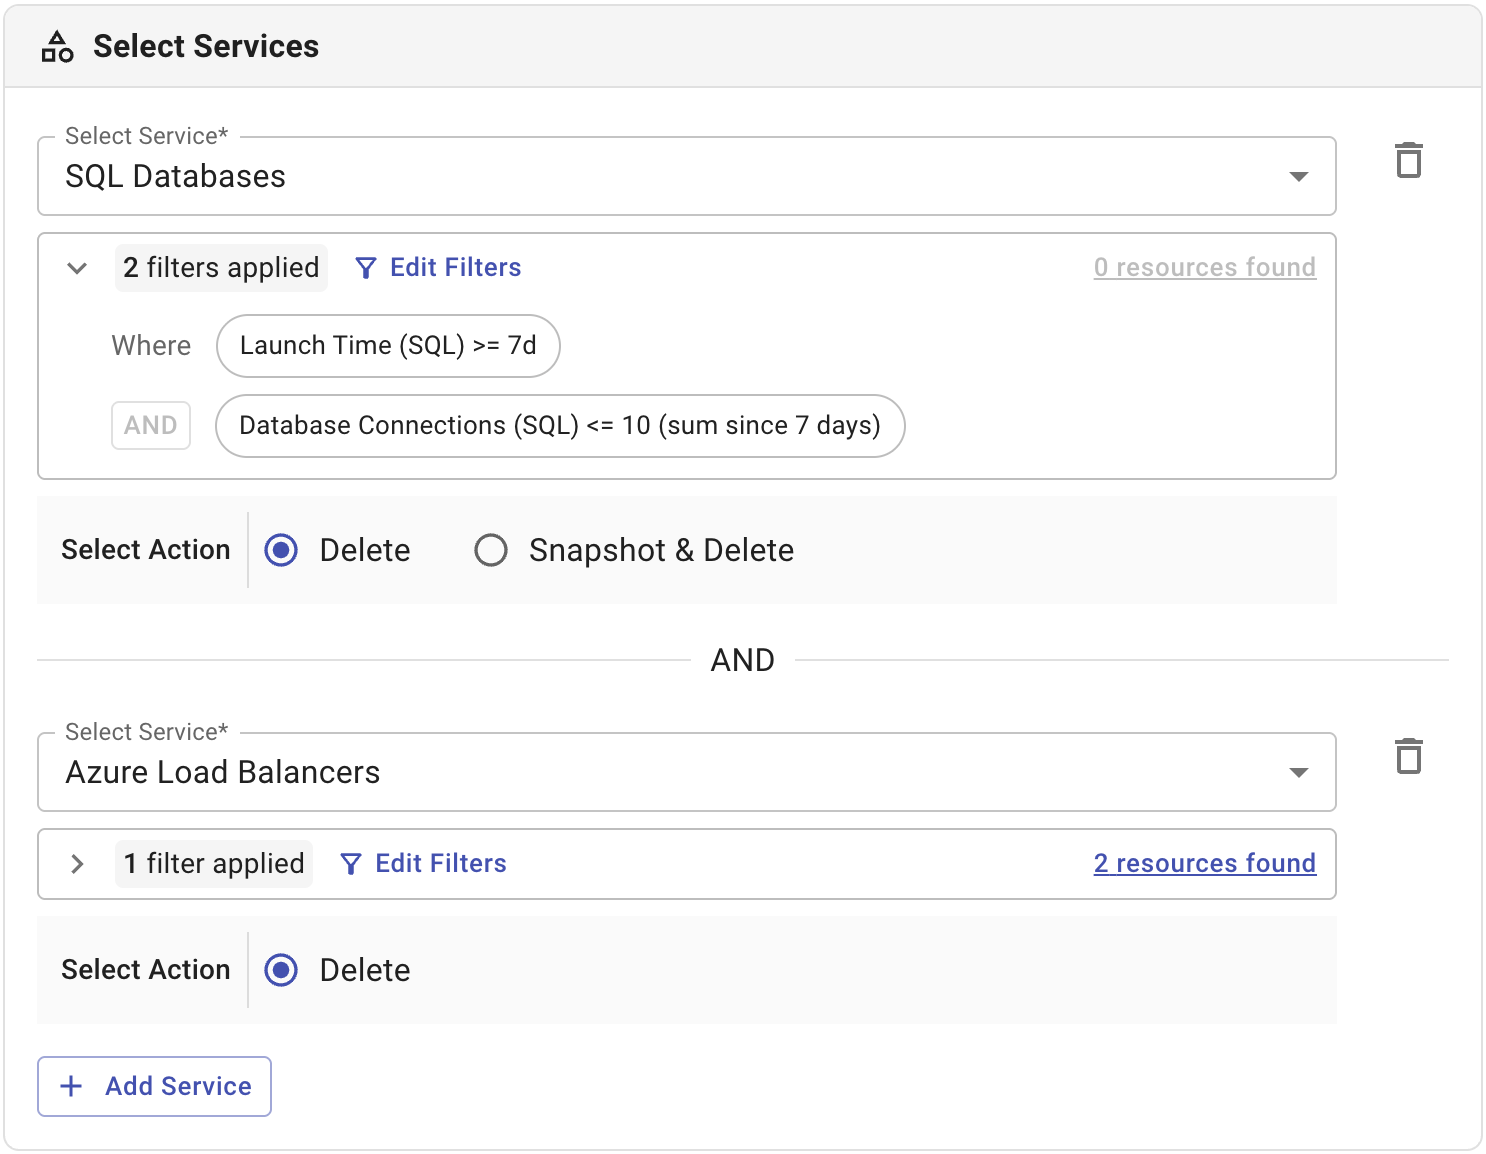
Step 3: Select Services
In this section, define which cloud services and specific resources your workflow will target.
- Select Service
Choose the service you want to automate actions for (for example, EC2 Instances). - Apply Filters
Use filters to narrow down resources that match specific conditions.
For example, you can filter EC2 instances that are Running and have CPU utilization ≤ 20% (maximum over the last 7 days).
Cloudchipr will display the number of resources found that meet your criteria. Click on theResources Foundbutton to view these resources in more detail in the opening drawer. You can edit these filters anytime by clicking Edit Filters. - Select Action
Choose the action to perform on the filtered resources. Available actions may vary depending on the selected service.
For EC2 Instances, the supported actions include: Delete, Create Image & Delete, Stop, Start and Reboot. - Add Additional Services
To include more services in the same workflow, click Add Service and repeat the process for each new service.
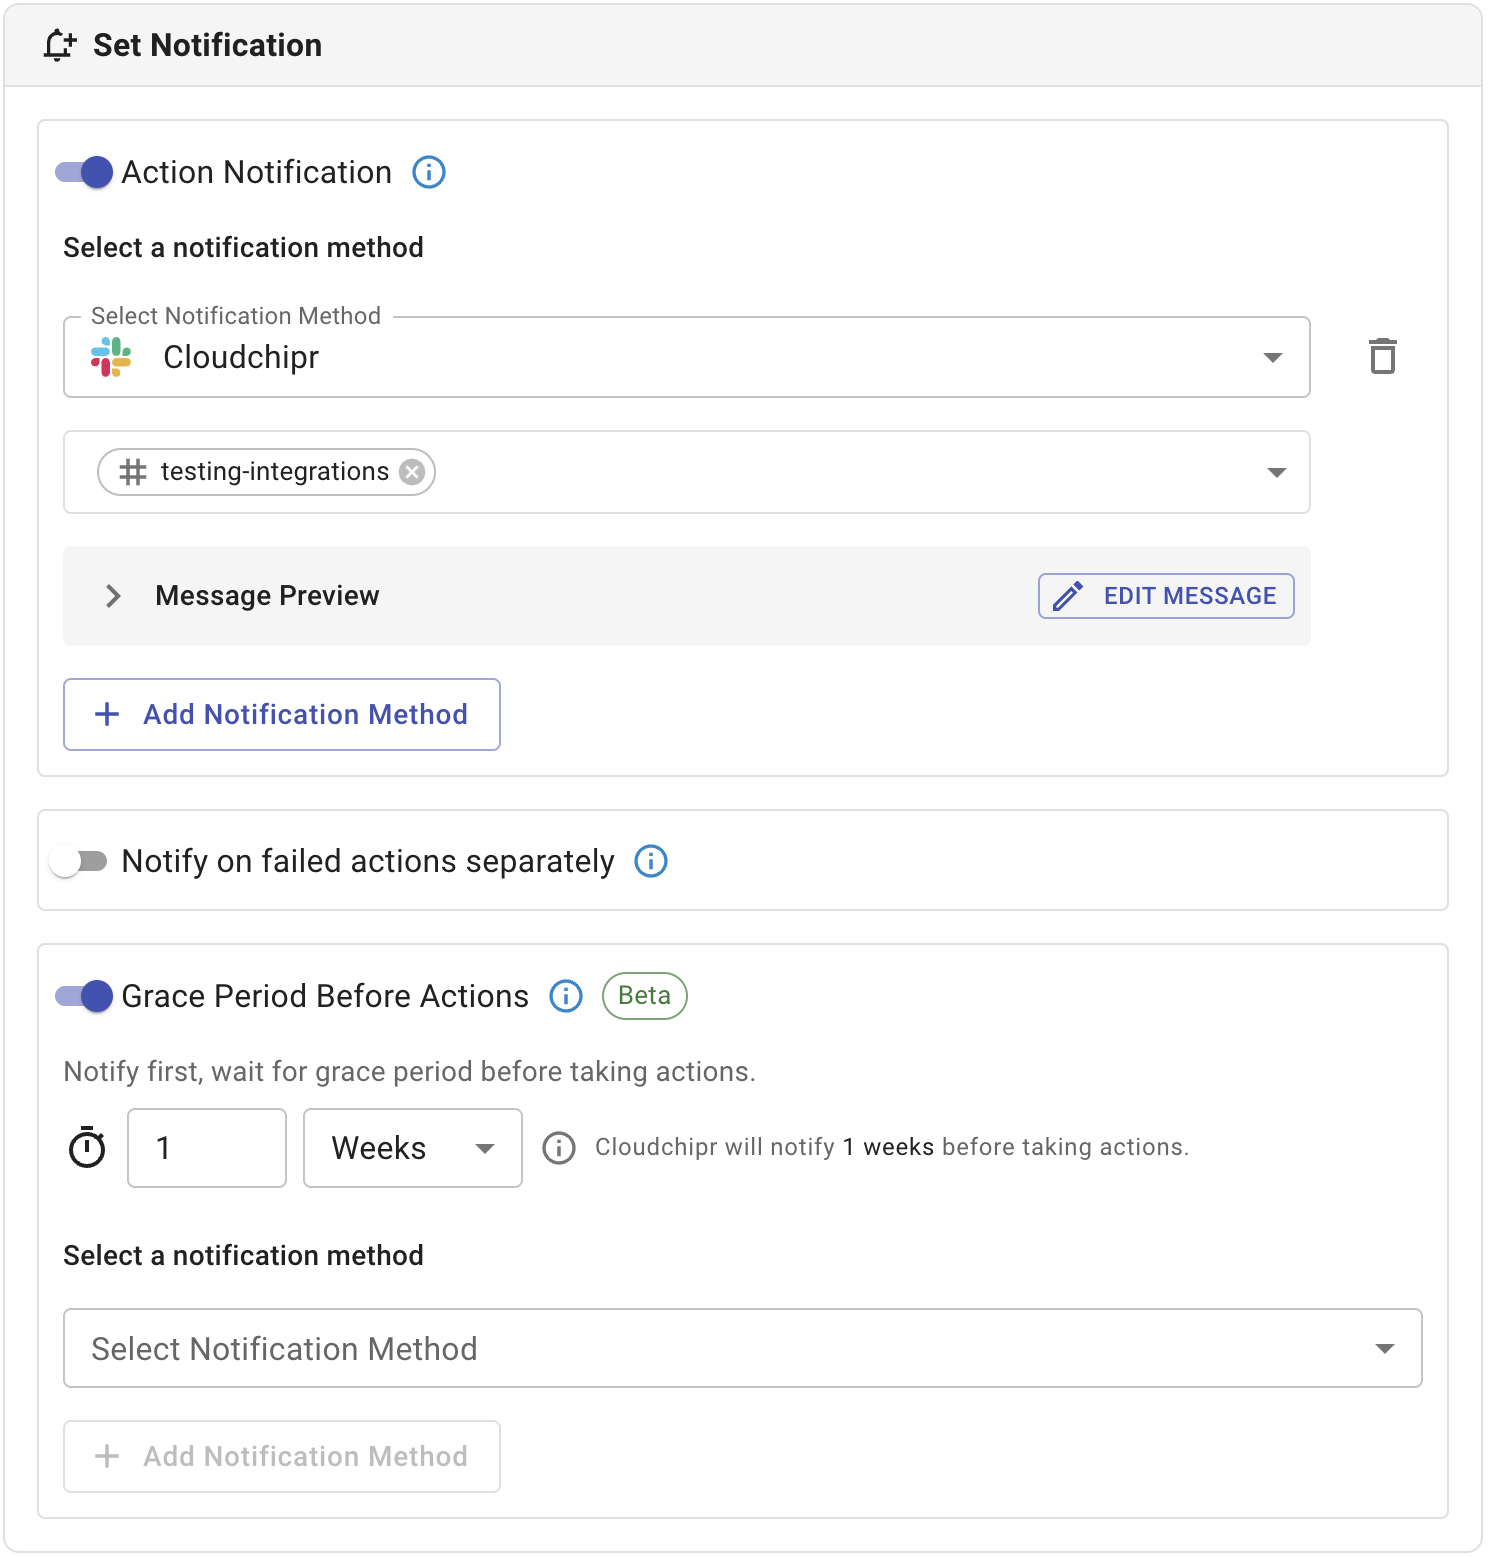
Step 4: Set Notification
Configure how you want to be notified about workflow executions and their outcomes.
- Action Notification
Enable this option to receive notifications each time the workflow executes an action.- Notification Method
Choose your preferred notification channel, such as Email or Slack, to receive updates on workflow runs.
You can add multiple methods if you want notifications to be sent through more than one channel.
- Notification Method
- Notify on Failed Actions Separately
Turn this option on to receive dedicated notifications only for failed actions. This helps you stay informed about issues without receiving alerts for successful executions. - Grace Period Before Actions
The grace period gives you time to review or cancel the workflow run if needed, adding an extra layer of safety when executing critical automation tasks.
When enabled, actions will only be taken after a notification is sent and the grace period has expired. You will be able to protect or backup your resources during the grace period.
Step 5: Preview and Create
After configuration, review all workflow details — including schedule, environment, selected services, and notifications — before creating it.
Once confirmed, click Create to activate it.
Notify Only Workflows
Navigate to the Automations > Workflows tab and click on the Create Workflow button, which will then show the actions menu with two actions. Click on Notify Only.
A Notify-Only Workflow allows you to receive alerts about specific resource conditions without performing any automated actions.
Start by giving your workflow a clear and descriptive name. The name should help you and your team easily identify its purpose, especially when managing multiple tasks. You can also add an optional description to provide more context.
Step 1. Set Schedule
Define how often and when the workflow should run. You can choose from Hourly, Daily, Weekly, or Once options.
- Every: Specify the frequency (e.g., every 1 day).
- Time: Set the exact time when the workflow will run.
- Timezone: Select the appropriate timezone for the schedule.
- Starts: Choose whether the workflow should start immediately (Now) or on a specific date.
- Ends: You can let it run indefinitely (Never Ends) or define an end date.
The Next run field displays the upcoming execution date and time based on your configuration.
Step 2: Select Environment
Choose the cloud environment where the workflow will be executed.
Supported providers:
- AWS
- GCP
- Azure
Within your chosen cloud provider, select one or more accounts and regions. This step allows for broader or more targeted workflow application.
Step 3: Select Services
In this section, define which cloud services and specific resources your workflow will target.
- Select Service
Choose the service you want to monitor (for example, EC2 Instances). - Apply Filters
Use filters to narrow down resources that match specific conditions.
For example, you can filter EC2 instances that are Running and have CPU utilization ≤ 20% (maximum over the last 7 days).
Cloudchipr will display the number of resources found that meet your criteria. Click on theResources Foundbutton to view these resources in more detail in the opening drawer. You can edit these filters anytime by clicking Edit Filters. - Add Additional Services
To include more services in the same workflow, click Add Service and repeat the process for each new service.
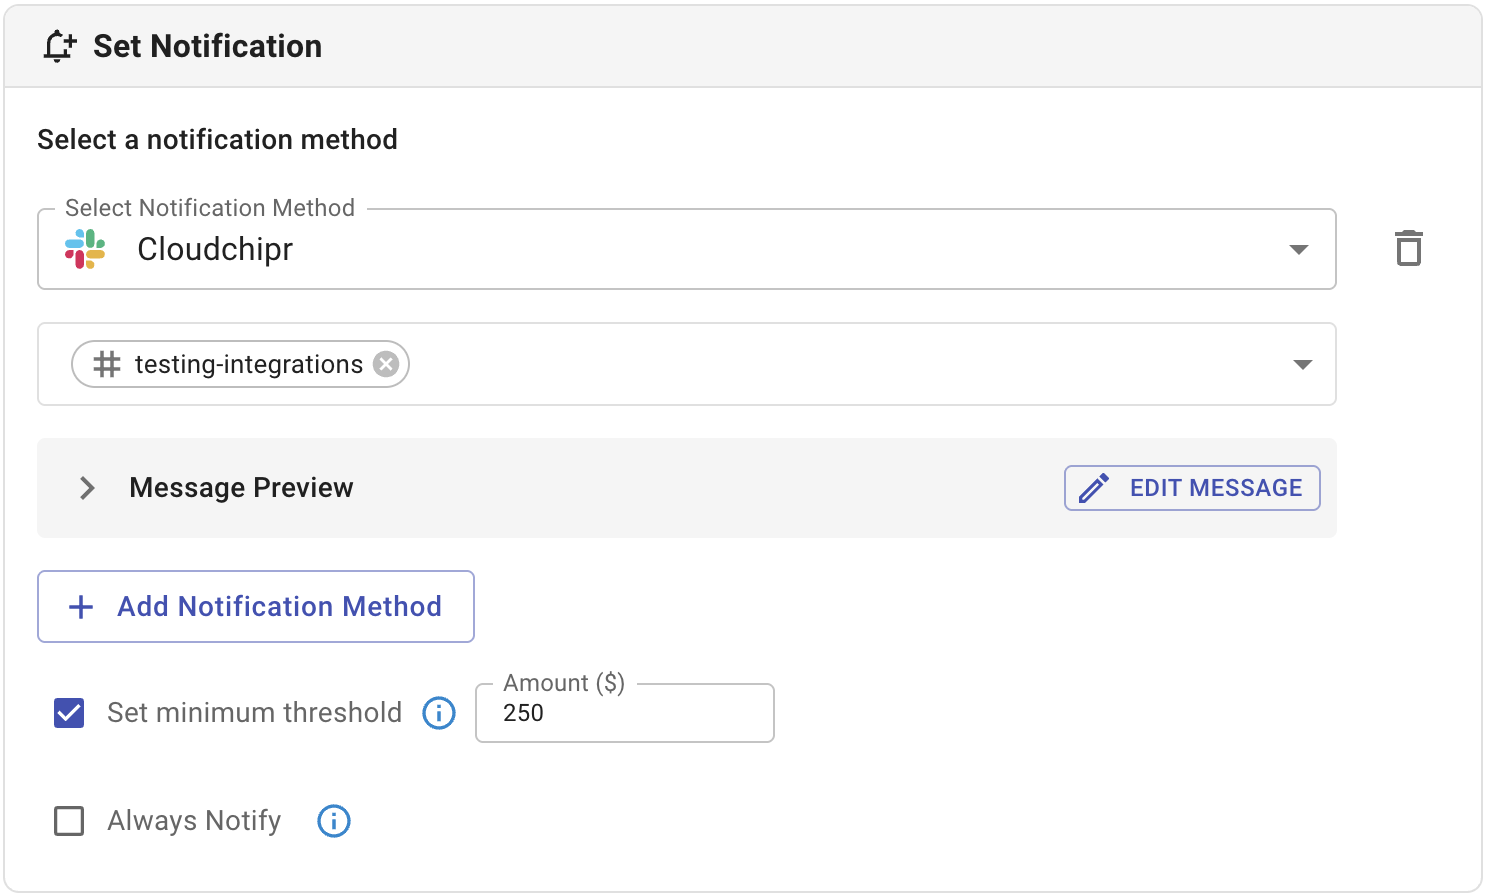
Step 4: Set Notification
Configure how you want to receive notifications when the workflow detects matching resources.
-
Select Notification Method
Choose your preferred notification channel, such as Email or Slack. When the workflow runs, it will evaluate the defined filters and send notifications to the selected channels, but it will not take any action on the resources.
You can add multiple methods if you want notifications to be sent through more than one channel. -
Additional settings:
- Always Notify: If checked, Cloudchipr will not keep track of the resources found during each run and will send notifications for the same resources every time.
- By default, Cloudchipr will remember the resources found after each run and will only send notifications when new resources are found or actions are taken on previously discovered resources
- Set minimum threshold: Receive notifications when costs exceed the defined threshold
- Always Notify: If checked, Cloudchipr will not keep track of the resources found during each run and will send notifications for the same resources every time.
Step 5: Preview and Create
After configuration, review all workflow details — including schedule, environment, selected services, and notifications — before creating it.
Once confirmed, click Create to activate it.
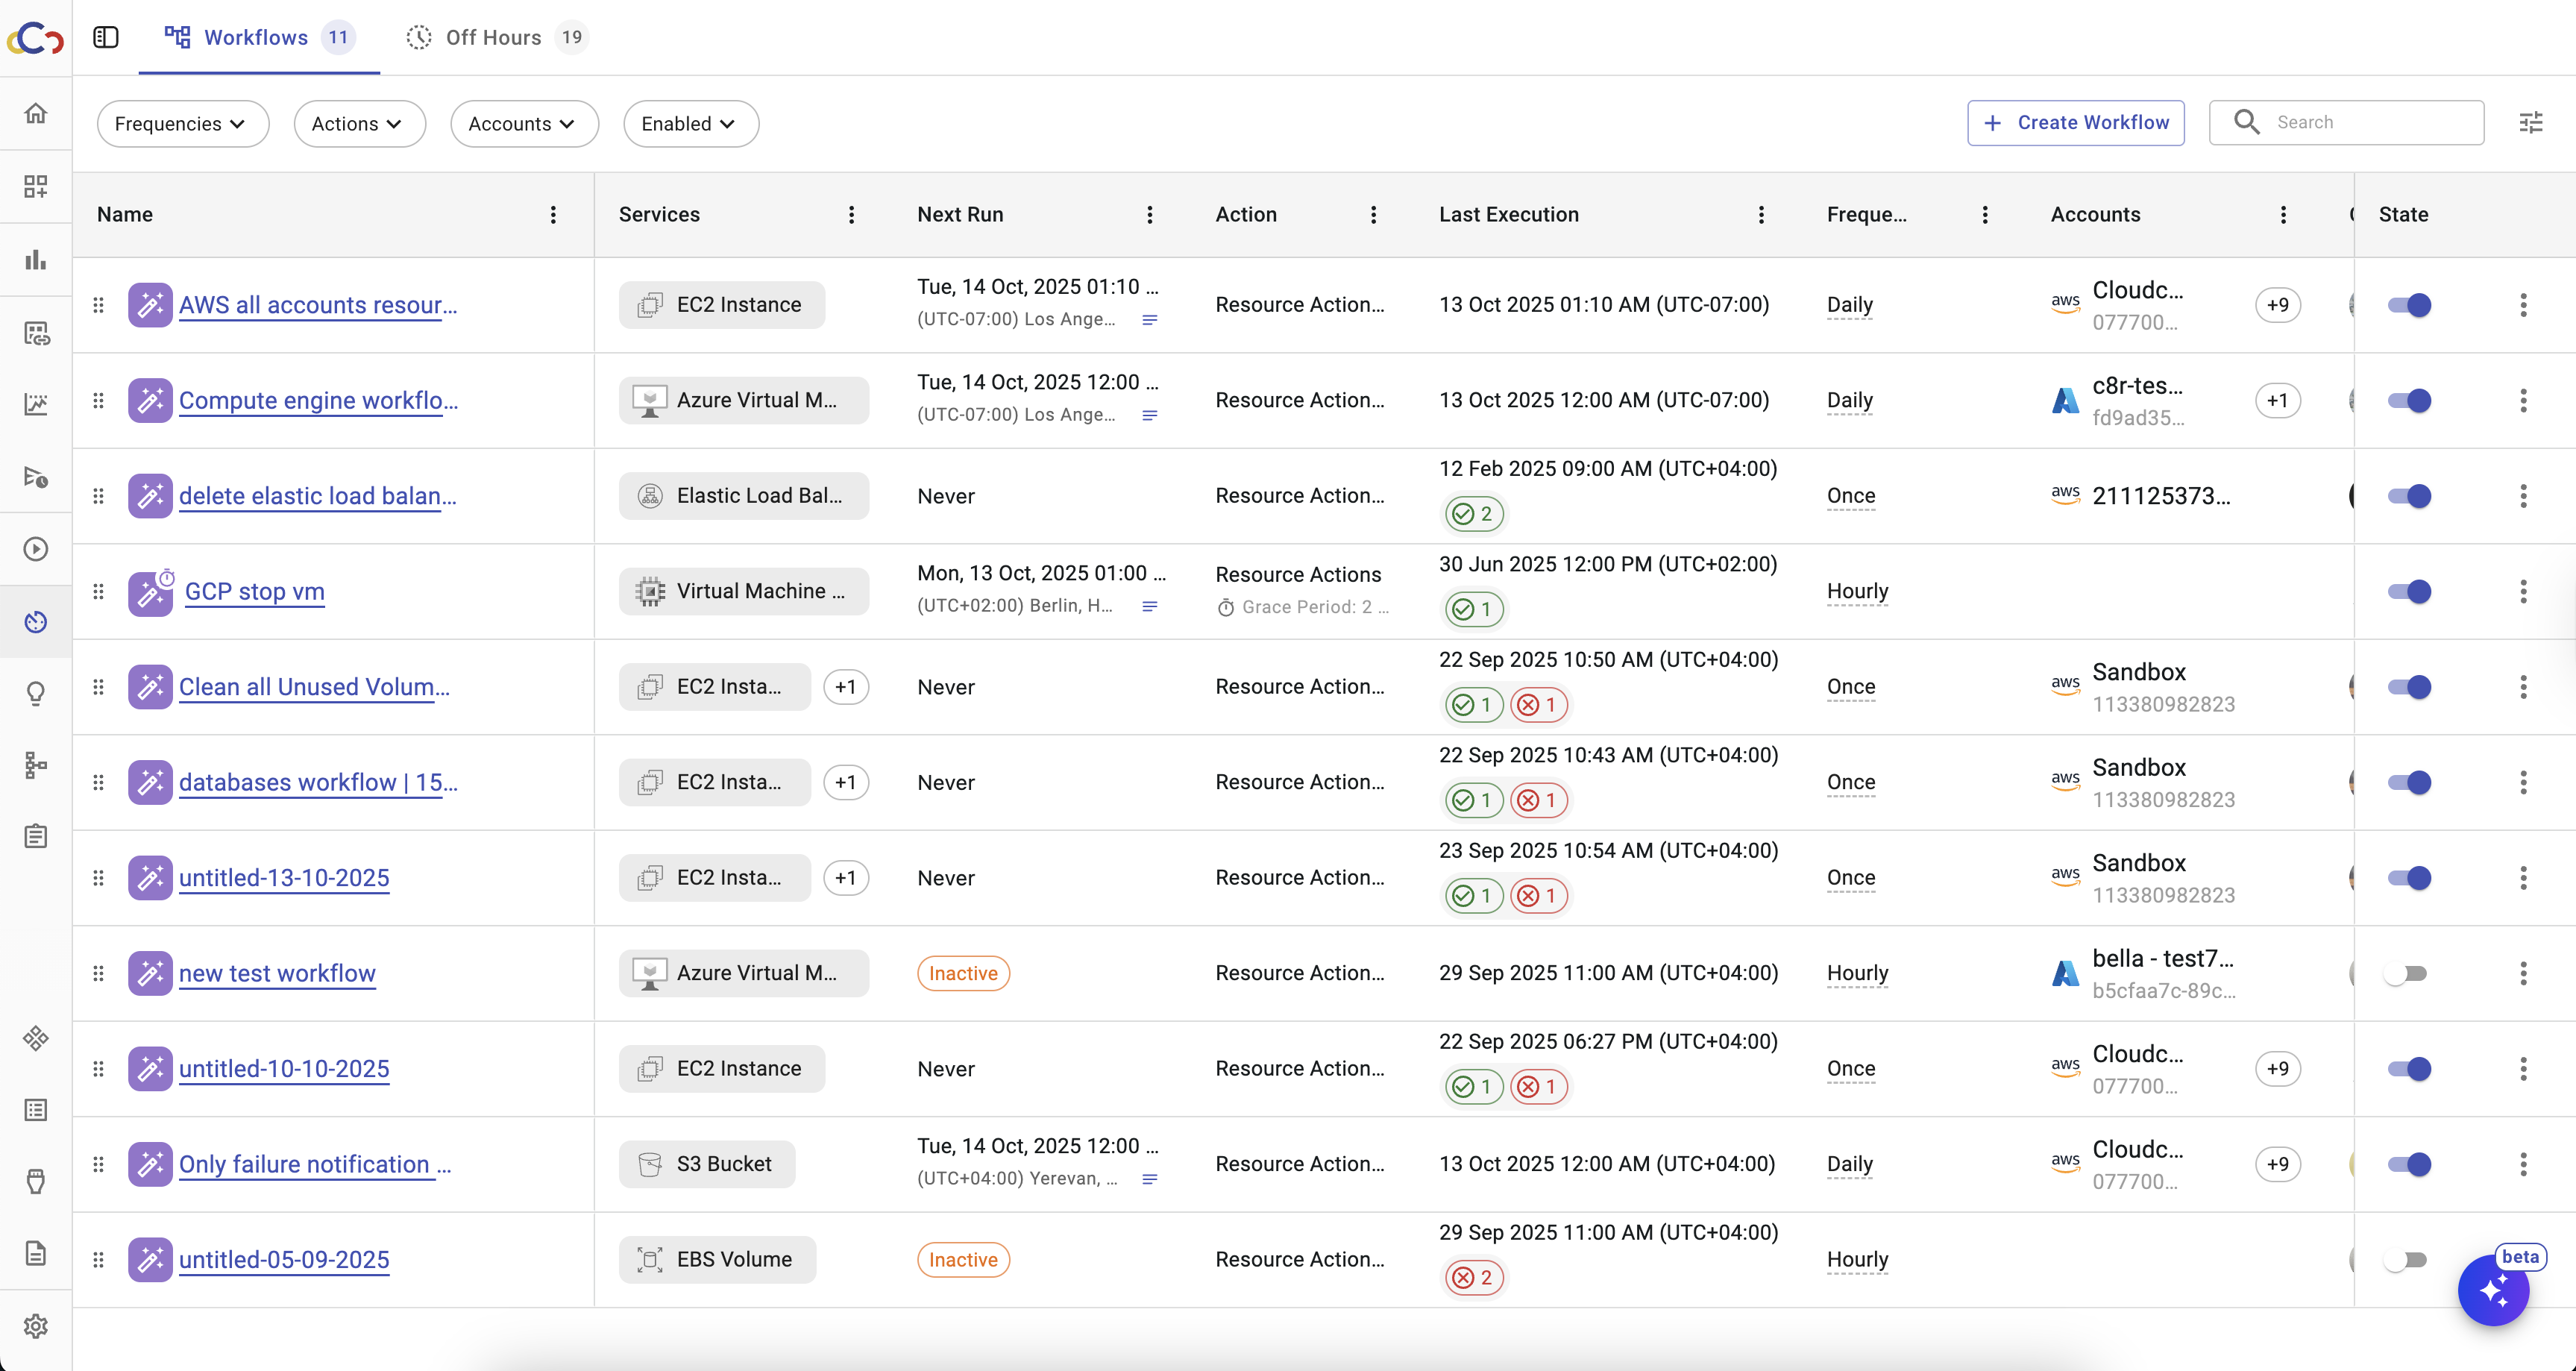
Workflows' Page
The Workflows page provides a centralized view of all automation workflows. From this page, you can easily track, manage, and control all workflows.
Workflows Table
The table lists all existing workflows with detailed information to help you understand and manage their configurations:
- Name and description
- Services: The cloud services included in the workflow.
- Next Run: The dates and times of the workflow’s next scheduled executions.
- Last Execution: The date and time when the workflow was last executed. A success or failure indicator allows you to quickly assess whether the workflow executed correctly. Also there is an ability to view the execution logs which you can find in the Execution Logs section.
- Action: Indicates whether the workflow performs an automated Take Action operation or functions as Notify Only.
- Frequency: The interval at which the workflow runs (Hourly, Daily, Weekly, or Once).
- Accounts: The cloud accounts targeted by the workflow.
- Created By and Last Modified By: The users who created the workflow and who last updated the workflow’s configuration.
- State: A toggle that allows you to enable or disable the workflow without deleting it.
Available Actions
From the Workflows page, you can manage your automations using the action buttons next to each entry:
- Edit
- Duplicate
- Delete
Updated 10 months ago